“Repowering” is what engine remanufacturers call it. Replacing a worn-out engine with one that has been remanufactured to like-new specifications can add years to a vehicle’s life and save the vehicle’s owner thousands of dollars that would otherwise have to be spent on another vehicle.
Today’s “zero percent financing” and “factory rebates” can make a new car or truck seem very attractive. But when you add it all up, it’s almost always cheaper to keep an existing vehicle even if it requires major repairs.
Replacing an engine is obviously a major repair that requires a sizable investment in a vehicle. For some older vehicles, the cost of replacing the engine may be more than the vehicle is worth. Yet many owners will have the engine replaced anyway because they don’t want to trade vehicles or they owe too much on the vehicle to trade it.
Reality Check
An engine that is properly maintained with regular oil and filter changes, changing the spark plugs, timing belt and coolant at specified intervals, etc., should last 100,000 to 150,000 miles or more. But many engines are not properly maintained. Oil and filter changes are put off too long. The coolant is never changed. Nobody remembers to replace the timing belt. Consequently, after thousands of miles of neglect, the engine falters or suffers a variety of fatal ills. It starts to burn oil. It fouls spark plugs and misfires. It burns a valve. It overheats. It blows a head gasket. The head cracks. The oil pressure drops dangerously low. Warning lights come on. It makes rapping, clattering, ticking noises. It’s hard to start. It seizes up and refuses to run.
When the engine finally reaches the end of the road, the vehicle’s owner has to make a painful choice: spend whatever it takes to fix or replace the engine, or get rid of the vehicle and buy another. Either way it’s going to cost him money. A car dealer won’t give him much trade-in value for his vehicle if the engine is blown. The only way to get rid of it is to junk it or sell it “as is” as a “mechanic’s special” at a big loss.
For really old vehicles, replacing the engine probably doesn’t make much economic sense unless the vehicle is a classic or has sentimental value (in which case the owner will lavish bucks on his pride and joy to keep it going). Where it makes the most sense is on vehicles that are four to 12 years old that are still in good condition and worth repairing.
Confirmation Time
The first step in replacing an engine is to confirm the old engine is beyond fixing or requires so much labor to repair that it’s better to replace it. Many internal problems can be repaired without having to completely overhaul the engine – provided the rest of the engine is still in relatively good condition. That includes replacing a blown head gasket, a broken or rounded camshaft, a cracked piston, worn valve guides, burned or bent valves, a cracked head or even a spun bearing. But if the block is cracked, can’t be repaired without major machine work or has to be completely disassembled, the cost of parts and labor may tip the scale in favor of replacing the engine.
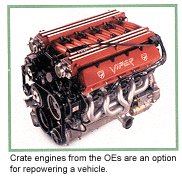
Replacement options include a used engine from a salvage yard (risky, but usually the cheapest alternative), a remanufactured engine (short block or long block), or a new “crate” engine from the original equipment manufacturer. Good used engines for many vehicles are hard to find and the salvage yard may or may not give you a warranty that covers installation labor. If the engine turns out to be bad, you can lose all your profit on the job. That’s why your safest bet is to install a new or remanufactured engine.
 Upgrade Options
Another option to consider when replacing an engine is upgrading performance. If your customer wants more horsepower, check out various performance add-ons that may be available. Aftermarket goodies run the gamut from bolt-on headers and camshafts to performance cylinder heads and complete induction systems.
Another option is to install a ready-built performance motor. Many engine builders offer mild to wild performance engines that can be custom built to almost any specifications. For street use, a “stage 1” or “stage 2” upgrade that typically includes a hotter cam, more compression, bigger valves and/or slightly modified head(s) work well and don’t cost much more than a stock replacement engine.
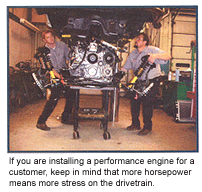
If you are installing a performance engine for a customer, keep in mind that more horsepower means more stress on the drivetrain and cooling system. Additional upgrades also may be needed to handle the extra power such as a larger radiator, beefed up transmission or clutch.
Preinstallation Tips
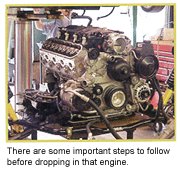
Okay, you’re ready to drop in the engine. But don’t roll that engine hoist into place just yet. The following is a laundry list of things that should be done or checked before the engine is installed:
Check the motor mounts. Replace if they are worn, loose or cracked. If the engine has fluid-filled hydroelastic motor mounts, check for leaks. Replacing same with same is recommended if the mounts are leaking to minimize vibration and harshness.
Check the condition of the clutch or torque converter, transmission, CV joints, U-joints, etc., and make any repairs as needed.
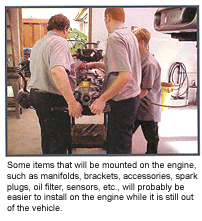
Some items that will be mounted on the engine, such as manifolds, brackets, accessories, spark plugs, oil filter, sensors, etc., will probably be easier to install on the engine while it is still out of the vehicle. Preassemble as much as you can, then finish the rest of the items once the engine is in place.
Install new belts and hoses (also, check automatic tensioners and idler pulleys and replace as needed).
Install new oxygen sensor(s). This is highly recommended on high-mileage engines to guarantee proper fuel feedback control, good fuel economy and emissions compliance.
Install a new coolant temperature sensor and thermostat. This also is highly recommended to reduce the risk of overheating and possible engine damage.
Install new spark plugs, plug wires, distributor cap and rotor (if equipped). Platinum long-life spark plugs are recommended.
Scan the computer for fault codes, fix any problems as needed, and clear the code memory.
Check for any PCM flash updates that may be available from the OEM and reflash the computer as needed.
Check for any engine-related technical service bulletins that are out on the vehicle, and make any upgrades or changes as recommended.
 Putting It In
When the engine is ready to be installed, carefully lower or raise it into position being careful to align the motor mounts, engine cradle and transmission. Maintain support until the engine is bolted into place.
Tighten all motor mounts, bellhousing bolts, manifold bolts, brackets, cradle bolts, etc. to specifications.
Make sure all hoses are properly routed (refer to the emissions decal or a manual if you need help), and all hose clamps are tight.
When reattaching wires, make sure the connectors are free from corrosion and fit tightly (repair or replace as needed). Use dielectric grease where needed to keep moisture out of connectors. Make sure all wires are properly supported and routed away from the exhaust manifolds and spark plug wires.
When reattaching the throttle cable or linkage, don’t forget the return springs. Replace the springs if they are weak or corroded.
Flush the radiator and change the coolant. Refill with a 50/50 mix of fresh antifreeze and distilled water. A long-life antifreeze is recommended for maximum protection.
Flush the oil cooler (if equipped). If the original engine had a bearing failure, replace the oil cooler to eliminate any risk of a repeat failure due to metallic debris in the oil cooler or lines.
Install a new air filter, fuel filter and oil filter.
Don’t forget to fill the oil pan with the proper amount of oil (usually four quarts, but may be more or less on some engines). Check the dipstick after filling to make sure it reads accurately. On overhead cam engines, 5W-30 oil is usually recommended so the oil will reach the upper camshaft and upper valvetrain components faster after startup (especially important during cold weather).

Check the battery’s charge and condition. The battery should be fully charged before the engine is started. Also, make sure the battery cables are clean and tight. And don’t forget to check the engine ground straps.
Make sure you don’t have any “leftover” parts.
After Installation…
Once the engine has been installed and refilled with oil and coolant, the fuel lines, emissions hoses and wires are all reconnected and the throttle linkage and return springs are in place, you can fire it up.
To reduce the risk of a dry start with a new or rebuilt engine, you can pressurize the oil system through the oil sending unit port with equipment designed for this purpose. This is a good idea for any engine that has been sitting for more than a few days prior to being installed.
With new and rebuilt engines, run the engine at 1,500 to 2,000 rpm for 20 to 30 minutes to break in the camshaft as required. Don’t let it idle.
Make any engine adjustments that may be required (ignition timing, idle speed, idle mixture, valve lash, transmission throttle cable, etc.). If the computer has any special “learning” requirements, follow the procedure as outlined to recalibrate/reset the computer.
Check all instrument panel gauge readings (oil pressure, coolant temperature and charging) to make sure they are functioning and reading within normal ranges.
Make sure the engine reaches and maintains normal operating temperature (check for proper cooling fan operation).
Take It For A Spin
Don’t skip this step! A test drive is absolutely essential to make sure the new engine runs smoothly and performs normally. The test drive should include idling, acceleration, deceleration and cruising at various speeds. In other words, it takes more than a quick spin around the block to verify everything is right.
During the test drive:
Check for hesitation, knocking or misfiring during wide open throttle.
Check for smooth and steady cruise conditions (no surging, misfiring).
Check for backfiring during deceleration. Also check the rearview mirror for blue or white smoke from the tailpipe (there should be none).
Check for smooth idle when stopped (no stalling, rough idle).
Listen for any unusual noises (leave the radio off and roll down the window so you can hear the engine clearly).
Note any unusual odors (there may be some smell from fresh paint but you should not smell gasoline, antifreeze or oil burning).
Check the operation of the cruise control system (if equipped).
Check the operation of the heater and A/C (if equipped).
After the test drive:
Shut off the engine and restart it at least twice to make sure it starts normally.
Recheck the oil level, coolant level, belt adjustments, etc. to make sure everything is ready before returning the vehicle to the customer. Also look underneath to make sure nothing is leaking.
Advise your customer to “take it easy” for the first few hundred miles, and to change the oil and filter at 3,000 miles (and every 3,000 miles thereafter) to keep the warranty in effect.
Additional photos in this story were courtesy of Westech Automotive, Inc., Silver Lake, WI