Any electrical circuit that is wired “hot at all times” has the potential to become a parasite to the battery.
There are some wanted parasites on the vehicle that are necessary to have, and some that are not. We’re going to find out how to “fingerprint” and track down the unwanted ones systematically.
A parasitic draw on the battery means that, while the key is in the off position, something is pulling amperage from the battery.
Like a glass of water that is slowly sipped on, it will run dry. The symptoms of a parasitic draw, or the customer complaints, can vary depending on the situation.
Not every vehicle with a parasitic draw will come towed in with a dead battery.
In fact, some may not even require jump starting to bring them in.
It just depends on how low the battery is allowed to get before the next start.
Intermittent electrical issues like:
• gauges sweeping or inoperative at start up;
• memory seats, mirrors and column not self adjusting;
• radio presets disappearing; and
• rough engine idle and harsh transmission shifting after first start-up in the morning are all possible symptoms of a parasitic draw on the battery. Any of those issues, and more, may have “healed” themselves by the time the customer brings it a shop to check them out.
Scanning for “Bugs”
When a driver experiences one of these issues that could be caused by a weak battery, possibly from a draw, it can be helpful to perform a full body code scan. Clues can be found in various modules such as a P1000 in the PCM, or “battery voltage low” codes found in air bag, ABS, instrument cluster and various body controller modules.
A vehicle with a battery voltage low code stored in any module should be tested for a parasitic draw.
Prepping the Patient
Getting a vehicle ready for a draw test involves a tad bit more than just hooking up an ammeter. With today’s vehicles, various modules (and lights) are awakened by simply operating a door handle.
Since the awakening of modules (and lights) will suddenly cause an expected electrical draw, how are you going to access the inside of the vehicle after you determine there is an unwanted draw in the passenger area?
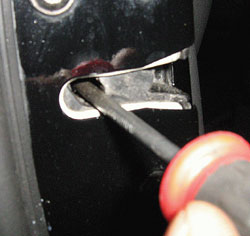
Opening a car door at that point will bury the draw test results in a flood of amperage flow to other circuits. Before beginning a parasitic draw test, remove the key from the ignition and open all doors including the back hatch if equipped. Then, defeat the door ajar switches.
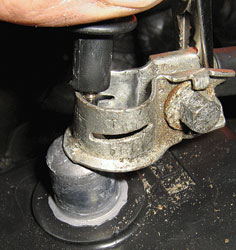
For many modern vehicles, such as this 2005 Ford Explorer, this is done simply by using a screwdriver to artificially close the latches. See Photo 1.
For others, defeating the door ajar switches may mean removal of the switches from the door jam or inserting something in the door jam that artificially depresses the switch.
Don’t forget to do the same for hood switches on some vehicles as well.
Removing the key and defeating all door switches with the doors open will give the body control modules the illusion that you have exited the vehicle, yet you will still have full access to the interior of the vehicle for later pinpoint testing.
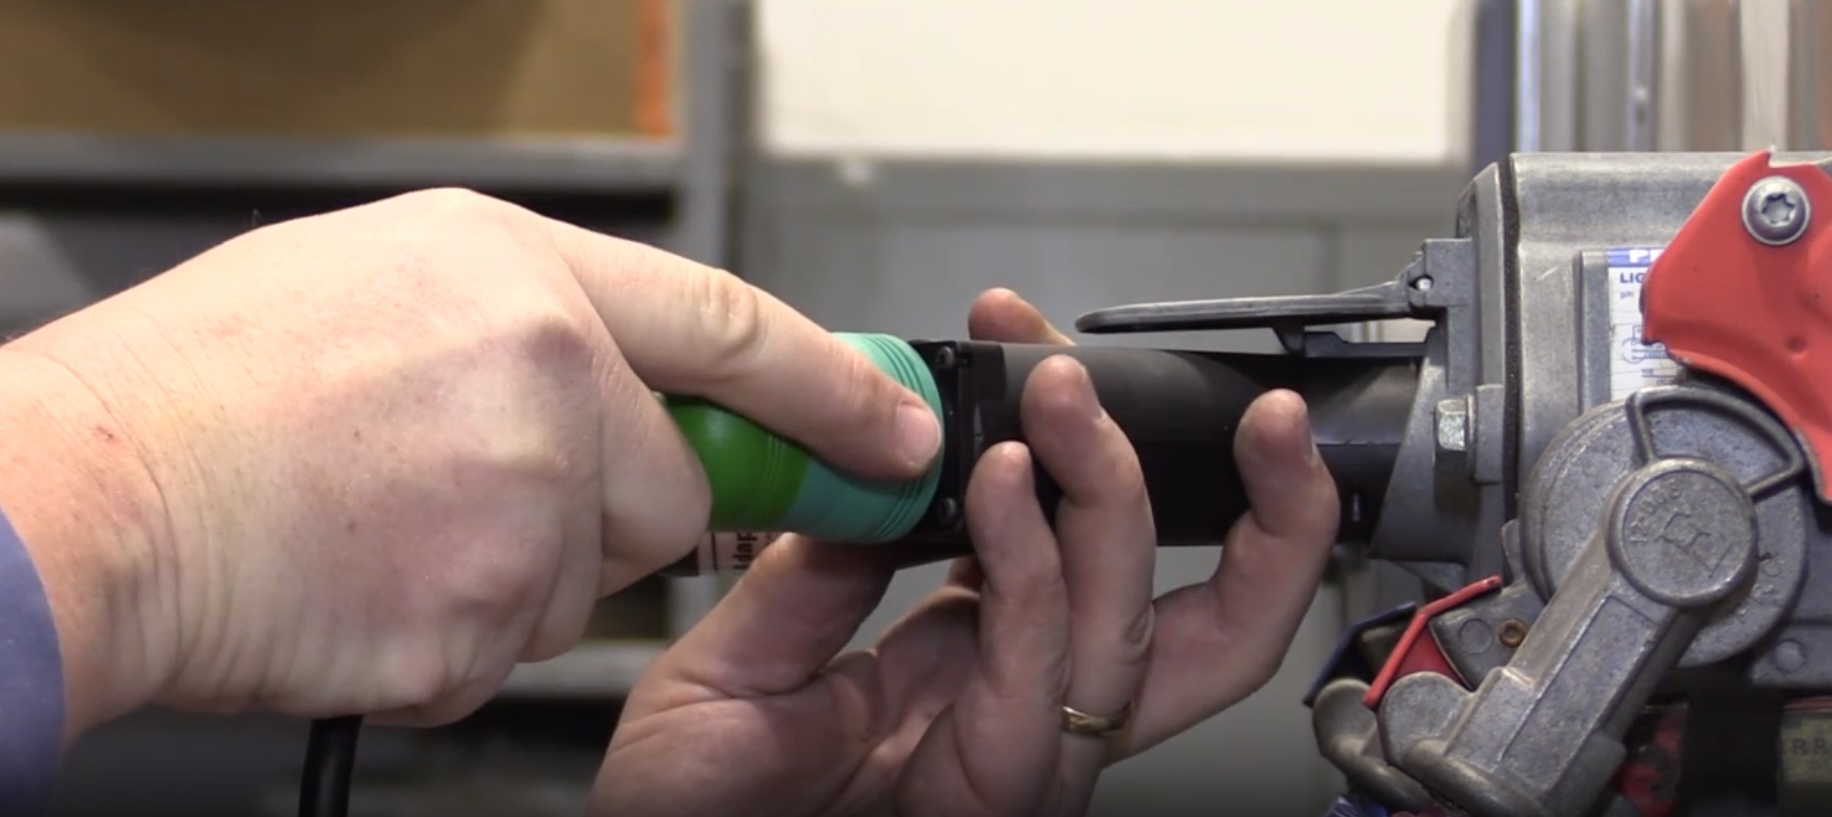
Next, set your ammeter up at the easiest to access (and cleanest) battery terminal.
Though you could just snatch the cable off and put your ammeter in-line, I suggest some care is taken at this point.
With most top post batteries anyway, it is possible to set your ammeter up without breaking the circuit with just a few simple and quick steps.
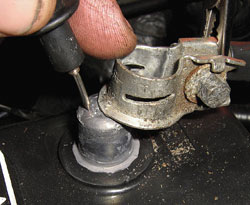
Step 1: Using a pointed lead for one tip and a gator clamp for the other tip, connect the gator clip to the cable and dig the pointed end into the top of the battery post for future foot holding.
Be sure the leads are properly connected to the DVOM and that the DVOM is set to the ammeter setting. See Photo 2.
Step 2: Lift the battery cable up, the ammeter will be completing the circuit if the cable loses contact with the post. Then slide the cable over to the pointed probe that is on the top of the post.
Push the eye of the battery cable down so that it is in contact with the battery post. See Photo 3.
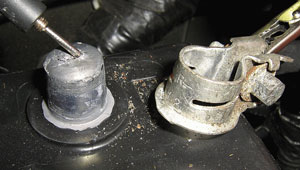
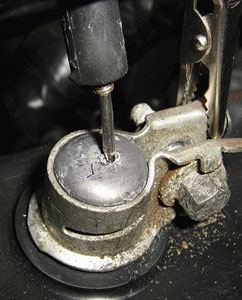
Step 3: Lift the pointed probe over the battery cable’s eye, and back to the post outside of the eye. See Photo 4.
Step 4: Pull the battery cable away from the post and drag the pointed probe back to the mounting dent that you made in the top of the battery post.
A few twists of the probe into the soft lead post, and the probe will stand up and hold itself in place for testing. See Photo 5.
For some vehicles, it might be easier to use a jumper pack set up for supplemental power while hooking up the ammeter, especially for side post batteries.
For others, this little bunny hop of the test lead may be faster.
But the idea here is to maintain things like radio (especially security radios), clock settings, power window settings (rather important to do so on some makes and models), and aftermarket alarm systems to reduce the unwanted stress of having to deal with a customer screaming about lost settings.
Ever have an alarm system lock out the starter and find out that the customer has no key fob for it?
That’s real fun. Granted, with the nature of the problem that we might be looking for next, we just might wipe some of that stuff out during testing anyway.
But remember, we don’t know for sure if we have a draw yet. So at this point, let’s not make more work for ourselves… there is still a chance we’ll find no draw after all.
It’s bad enough to lose some settings when we have to, it’s worse when we later find out we didn’t have to at all.
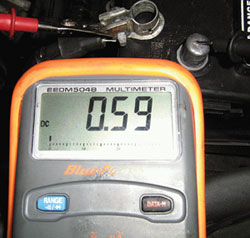
OK, so now the ammeter is set up and we have a value showing on the meter. Wow, the meter is showing 0.59 amps. See Photo 6.
That’s a pretty hefty draw there. Is that a problem? Actually, it’s too soon to tell. Remember all that door ajar switch defeating we did a little bit ago? Why did we do that?
There are some body modules on this vehicle that haven’t gone to “sleep” yet.
On any given vehicle there can be a handful of modules like BCM (GEM), vehicle security, lighting control and so on that will stay awake for as long as 45 minutes after the last door handle, door switch or key-in-sense switch has been tripped.
So, we need to wait about an hour before reading the ammeter.
Leave the ammeter hooked up, just turn off the power switch on the ammeter and go do something else for an hour.
We’ll come back to that later, just remember where we left off.
Finding “Fingerprints”
Some techs will argue that you can use a bulb-type test light for draw testing, and some will argue that you cannot do it on today’s cars.
I’m not going to sit here and tell anyone that they can’t possibly test for a draw with a test light, because I myself have done it.
On the other hand, I’m not going to endorse the use of a test light for draw testing either. Even though I’m guilty of it, I will say that draw testing with a test light is unwise.
If a draw is small enough, it may be missed with a test light. If it’s large enough to see with a test light, just how large is it? It’s unwise to attempt to use a test light largely because it doesn’t allow you to see the parasite’s “fingerprint.”
What I mean by a fingerprint is that different items have a signature amount of amperage that they will draw. For example, you might measure a parasitic draw of 0.15 amps at the battery.
Everything that is wired hot at all times is suspect of a draw, but there might only be one item on the vehicle that will draw that exact signature 0.15 amps and also wired hot at all times.
In theory, if there were a published spec you could look at of what each item draws, you could probably go straight to it off of that.
But as it is, you have to hunt for it… but at least you know that you are hunting for a 0.15-amp draw.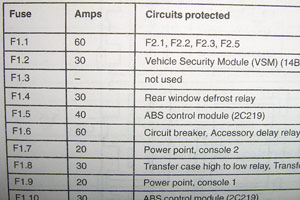
A test light hides that fingerprint from you. With a test light, what is a 0.34-amp brightness? Or a 0.25-amp brightness?
How bright is “a little bright?” Have you ever had a draw go away after you’re getting close to it during testing?
If you know the signature amperage, and you’ve narrowed the suspect down, you might be able to prove to yourself what the draw is by manually stimulating a suspect module to see if its signature draw matches what you were hunting for before it “healed” itself.
You can’t do that accurately with a test light.
Exploring for Current Draw
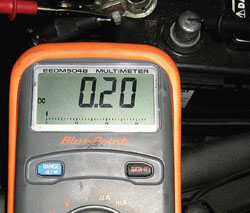
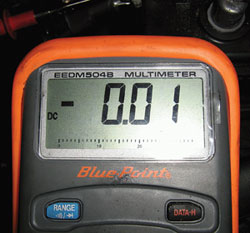
Let’s go back and check that 2005 Explorer. After a suitable time out period, the amperage draw has reduced to 0.20 amps.
See Photo 7.
That’s better; some modules have gone to sleep, but still something is sneaking electron sips from the battery and we have its fingerprint.
The next step is to isolate the circuit where the offender is hiding.
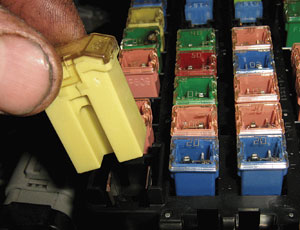
A great way to do this is remove and reinsert underhood fuses one by one while monitoring the draw amperage. However, keep in mind, that while you do this, you will often wake up modules when you reinsert the fuse.
In which case, you will need to wait until such a module goes back to sleep before continuing to the next fuse.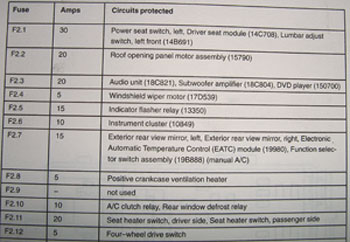
When you pull the right fuse, the draw will stop on the ammeter. In the case of this Explorer, it was a 60-amp fuse in the underhood fuse panel — fuse 1.
See Photos 8 and 9.
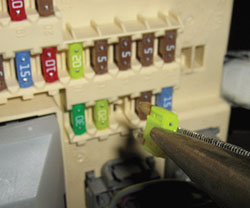
When fuse 1 was pulled, the current dropped to zero. Looking at the fuse explanation chart (Photo 10) for the underhood fuse panel (panel number 1), shows fuse number 1 (1.1) to supply power for fuses 1, 2, 3 and 5 in the interior fuse panel (panel number 2).
Pulling these fuses one at a time in the interior fuse panel hit pay dirt when fuse 3 was removed, the current draw dropped to (nearly) zero once again.
See Photo 11.
Looking at the fuse chart for the interior fuse panel found three suspects listed. See Photo 12.
The draw was proven to be in the direction of the audio unit (radio), amplifier or the DVD player (if equipped).
The DVD player was quickly eliminated from the suspects list, due to the fact that this vehicle didn’t have one.
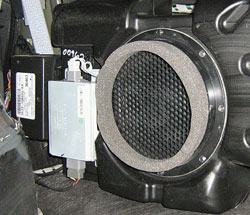
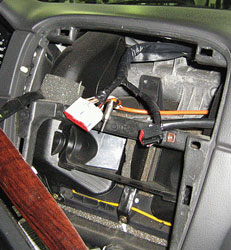
The amplifier is behind the trim panel to the right of the cargo area. Not hard to get to, but the radio slides out of these easier.
So, the radio was removed and unplugged to see if the draw went away. See Photo 13.
With the radio unplugged, the ammeter was inspected again for the results.
The draw was still there. Only one suspect module left now. Time to go prove it.
With the amplifier disconnected (still shown as connected in Photo 14), the amperage dropped instantly.
The cause of this draw was that the amplifier was not going to sleep. A new amplifier fixed this vehicle.