Squeals, groans, creaks and chatters are all noises nobody wants to hear when they apply their brakes. Whether a vehicle is brand new or one that is 10 years old with 120,000 miles on the odometer, most people today expect their brakes to be quiet and not squeal, groan or howl in protest every time the vehicle comes to a halt.
Silence is golden
On new cars, brake noise is totally unacceptable. OEM brake engineers spend hours and hours fine tuning the brake system so it will be as quiet as possible. This may require tweaking the friction material, redesigning the shape of the pads, adding or changing pad shims or anti-rattle clips, or making other changes in the rotors or calipers to dampen and eliminate brake noise.
Once a vehicle has racked up some miles and is out of warranty, though, most motorists develop much more tolerance for brake noise – as long as the noise isn’t too loud, too irritating or too unsettling. They’ll often put up with a lot of squeal to avoid having to pay for brake repairs out of their own pocket. As long as the vehicle stops normally and the pedal doesn’t shake too bad, they’ll live with the noise.
What scares motorists most is when a brake noise suddenly appears. And the louder the noise, the more likely they are to take notice and make an appointment to have their brakes examined.
The point here is that brakes should be quiet (especially new brakes). But some brake noise may be normal, especially on older high-mileage vehicles with semi-metallic disc brake pads. Even so, brake noise may indicate a problem. So if the brakes are noisy, the brake system should be inspected to determine the cause. It might be nothing serious, or it might be something major. There’s no way to know for sure without examining the brakes.
Whats Making the Noise?
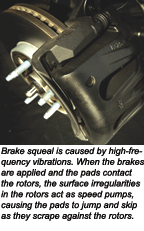
 Brake squeal is caused by high frequency vibrations. When the brakes are applied and the pads contact the rotors, tiny surface irregularities in the rotors act like speed bumps causing the pads to jump and skip as they scrape against the rotors. This, in turn, causes the pads to shake and vibrate in the calipers and against the caliper pistons. It also causes the calipers to shake and vibrate on their mounts and bushings. The greater the play between all of these parts, the greater the amplitude of the vibrations and the louder the squeal. The rhythmic vibrations of the pads rubbing against the rotors also creates harmonic vibrations
 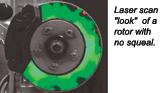 in the rotors that causes them to ring like a cymbal. The areas generating the most noise can be seen with special laboratory equipment that uses a laser to scan the surface. Changes in color reveal the intensity and frequency of the vibrations. Researchers have found that rotor vibrations are not uniform all the way around a noisy rotor. The rotor has certain spots or “nodes” that oscillate more than other areas. By redesigning the casting and changing the location of the cooling fins between the rotor faces, some of this noise can be tuned
  out.
out.
(This is a good reason to use replacement rotors that have the same cooling configuration as the original).
Even the metallurgy of the rotors makes a difference. Some grades of cast iron are quieter than others. That’s one of the reasons why composite rotors have been used on various vehicles over the years. Besides being lighter, composite rotors can also be quieter if the right grade of cast iron is used for the rotor disk. Replacing a composite rotor with a solid cast rotor changes the harmonics and frequency of the brake system, which may increase brake noise on some applications.
Rotor finish also affects noise. The smoother and flatter the surface, the less the 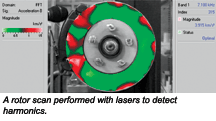 likelihood of the pads chattering and dancing as they ride across the surface. Rotors should be resurfaced at the proper speed and feed rate, and with sharp tool bits to achieve the smoothest possible finish. Light sanding with an abrasive disk or flexible honing brush after the rotors have been turned can improve the surface finish even more and provide an extra degree of assurance the rotors will remain noise-free.
Noisy Pad
Equally important are the pads themselves. Some friction materials are noisier than others, just as some brands of pads are quieter than others. The sound control qualities of any friction material depends on the fillers, lubricants and other ingredients that go into the mix. Some manufacturers add graphite and other materials to pads to dampen noise.
 The design of the pads also influences their ability to suppress noise. If the leading edge of the pads has a sharp edge, it increases the tendency to grab and bounce more than if the leading edge is chamfered. That’s why most premium grade brake pads have chamfered edges. The pads may also have a slot down the middle to increase flexibility, cooling and venting. Some pads also have integrally molded shims and a multi-layer construction to reduce noise.
Seeking the Squealers
When inspecting the brake system, pay close attention to how tightly the pads fit in the calipers, and if any shims behind the pads are loose or badly corroded. Stainless steel shims are pretty durable, but plain steel shims have no corrosion resistance and become badly corroded after a few years of service (especially in wet climates or northern climates where a lot of road salt is used). As the rust builds up, it pushes the pads away from the caliper and increases the risk of vibration and noise. Badly corroded shims can also crumble and fall apart leaving a big gap behind all or part of the pad.
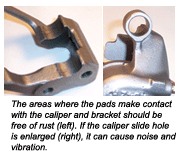 Also look for missing, broken or loose anti-rattle clips (if used). These parts are often overlooked or omitted when brake pads are replaced. But if they were used on the OEM pads, they were there for a purpose and should be reused or replaced to maintain the same dampening characteristics of the brake system.
Should you find a pad where the friction material has separated or broken loose from the backing plate, the pad must be replaced immediately. This is a dangerous condition that can lead to brake failure.
Pay close attention to the caliper mounts. Play or wear between the caliper and its bushings or mountings can be a source of noise. So too can rough grooved rotors or improperly finished rotors. Also, look for discoloration or glazed patches on the rotors that would indicate hard spots and uneven wear. Replace rotors with hard spots or severe cracking.
If an inspection of the brake system reveals no serious faults such as worn, loose or damaged parts, your customer has a choice to make. He or she can live with the noise, or they can pay you to eliminate the noise. The fix typically involves replacing the pads and resurfacing the rotors.
 Replacing the Old Pad
Semi-metallic pads and those with a high metallic content tend to be more noisy than low-metallic pads or those with little or no steel or iron content. Semi-metallic pads are required on many applications to handle high brake temperatures.
If different replacement pads are substituted for semi-metallics and they can’t handle the heat, you may end up trading a noise problem for a pad wear problem.
The best results are usually obtained by installing premium pads. Look for ones that use stainless steel shims rather than plain steel shims, or that have integrally molded shims. Most premium pads also have chamfers and slots to reduce noise. Some also have a multi-layer construction with a softer friction material on top to improve break-in and noise control during the first few hundred miles of operation.
If new pads are installed without shims, applying a brake noise compound to the backs of the pads will help keep them quiet and reduce the risk of a noise-related comeback. Most of these products are a high temperature RTV silicone based material that forms a pliable and durable cushion on the backs of the pads. The material must be allowed to cure 30 to 60 minutes before the pads are positioned in the rotors. Do not get any of this material on the front of the pads.
 Try a Lubricant
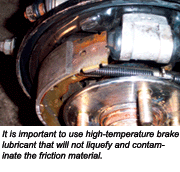
Another way to dampen noise-producing vibrations is to apply a high-temperature brake lubricant to the backs of the pads, and the points where the pads contact the caliper. Lubricating the caliper mounts, shims and bushings is also recommended to dampen vibrations here. The lubricant acts as a cushion to dampen vibrations. It also helps the parts slide smoothly so the pads wear evenly (uneven pad wear is a classic symptom of a floating caliper that is sticking and not centering itself over the rotor).
The key here is using the right kind of lubricant. The lubricant must be heat resistant so it won’t melt and run off the pads, and it must be durable so it will provide long-lasting protection. Synthetic lubricants that contain moly are a good choice for this type of application.
NOTE: Petroleum-based lubricants should never be used for brake assembly work because mineral oils can cause seals to swell and fail. Never use ordinary “chassis grease” on brake caliper sleeves and bushings. Chances are that within 500 to 1,000 miles the chassis grease will break down and form a gooey mess that will cause the caliper to seize.. Also, do not allow the lubricant to come into contact with the fronts of the pads or the rotor face. Keep it on the backs of the pads and the pad contact points.
Or a Spray
Another trick that can be used to dampen noise is to spray the rotors with an aerosol product designed to dampen noise and assist pad break-in. Spray-on surface treatments obviously don’t last forever, but they can help dampen noise for several hundred to several thousand miles depending on how often the brakes are used. These products typically contain lubricants and microfine aluminum particles.
According to one manufacturer who makes a spray-on rotor treatment, the particles form a molecular bond with the rotor surface and creates a “composite” surface that allows for a more controlled burnish as the new pads seat in. The result is less vibration, no annoying noise and a smoother feel.
Finishing Up With The Rotors
Rotor finish also plays a big role in reducing noise. If you are responsible for cutting your own rotors, keep your lathe bits sharp.
Rotors must be clean, smooth, flat and within OEM specifications to keep noise at bay. The recommended rotor finish for most applications is 60 to 80 microinches or less. A range of 20 to 50 microinches will usually guarantee quiet operation even on vehicles that are sensitive to brake noise.
Composite rotors require special care when resurfacing because they lack the rigidity of cast rotors. The rotor needs to be supported by large bell caps or adapters otherwise it may flex leaving tool chatter marks on the surface. The other alternative is to use an on-car lathe to resurface composite rotors.
Use a slow feed rate to achieve the finest finish. Don’t rush the job or you’ll end up with rough, grooved rotors that grab the pads and generate noise. Also, remember to wash the rotors with soapy water and a brush after they have been turned to remove residue you don’t want to be embedded in the new pads.
A properly turned rotor that is within OEM surface finish specifications should not require any additional sanding. Even so, many people feel sanding with #150 grit abrasive or a flexible bead style rotor finishing brush improves the rotor surface and reduces the risk of squeal.
If sanding with a flexible bead brush, use a drill speed of 300 to 600 rpm (never exceed 1,000 rpm) and bring the tool into contact with the rotor at a slight angle. Use light uniform pressure and keep the brush moving. Ten to fifteen seconds of brushing clockwise followed by 5 to 10 seconds of counterclockwise should product the desired finish.
As you can see, brake systems are complex and require an understanding of what is the root cause in generating the noise. But if you follow proper service techniques to this system, you will be able to reduce brake noise, keep you future customers happy and find that Silence, truly is, Golden.