Make sure to remove all of the old grease from the slide pin holes.
8. Check the looseness of the front wheel bearing and runout in the axle hub before removing the rotor. Hold the front disc with the lug nuts (torque: 103 Nm or 76 ft/lbs).
9. Using a micrometer, measure the rotor’s thickness in at least six areas. (See Photo 5)
 10. Check for runout by holding a dial indicator 10 mm away from the outer edge of the rotor. Maximum disc runout: 0.05 mm (0.0020 in.). Before removing the rotor, mark the high and low points of runout.
Also, mark the rotor’s position on the hub. If you do this, you can change installation positions of the rotor and axle so that the runout will be reduced. After the rotor has been removed, measure the runout in the face of the hub and mark the high and low points.
11. Machine the rotor with either a bench or on-the-car brake lathe.
12. Install shims on the new brake pads. If you are using original-style shims, apply high temperature disc brake grease to the area where the anti-squeal shim No.1 makes contact. Install the two anti-squeal shims No. 1, and the two anti-squeal shims No. 2 to the front disc brake pads. (See Photo 6)
NOTE: Do not use excessive amounts of grease that can contaminate the friction material once the brakes have been heated.
13. Install the caliper support brackets with the two bolts. (Torque: 109 Nm, 81 ft/lbs.)
14. Install front disc brake cylinder slide pin. Toyota recommends lithium soap-base glycol grease. Push the front disc brake cylinder slide pin into the dust boot and install it. Make sure the dust boot’s seals are in the grooves on the pins.
15. Install the abutment clips on the lands of the caliper bracket. A high-temperature, brake-specific grease can be used on the surfaces that make contact with the tabs or ears of the pads. Apply only a very light coating.
16. Install the pads in the caliper brackets. Toyota advises that the supports (abutment clip) have sufficient rebound when installing the pad. Also, check that the pad does not have too much play after installation. This can lead to brake drag and increased fuel mileage.
17. Gently push in the caliper piston only enough to fit over the new pads and shims. Toyota says that it is not necessary to crack the bleeders during this procedure and doing so could cause more problems than it solves. If you feel comfortable blocking the brake hose and cracking the bleeders to remove displaced brake fluid, it can be done this way.
See TSB BR0012 for more information.
18. Install the brake calipers. (Torque: 34 Nm or 25 ft/lbs.)
19. Install front wheels. (Torque: 103 Nm or 76 ft/lbs.)
20. With the car still powered down with the key out of the ignition, stroke the pedal several times to bring the pads in contact with the rotor.
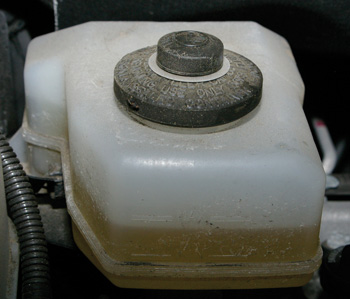
21. Check fluid level in the reservoir. (See Photo 7) Adjust the brake fluid level to the MAX line with the power switch on (IG). The brake fluid level must be adjusted to the MAX line.
22. Test drive the vehicle. Make sure that you perform several stops to 0 mph and at least one hard stop. If the ABS warning light does not come on, you are finished. If an ABS light does come on, you will need to perform some additional steps.
ABS Light On?
If the ABS light did come on during the test drive, disconnecting the battery is not the way to clear the codes. Yes, it will clear some codes, but you will have to recalibrate the steering position sensor and other items, like the automatic power windows, will stop functioning.
What happened during the test drive is that the pressure sensors at the wheel detected an abnormal reading when the hydraulic system was first engaged. The system may have detected low pressure when extra fluid is required to bring the piston into contact with the rotor, or residual pressure from you pushing the piston back. DTCs may be stored if brake fluid leaks, wheel cylinder vibrates due to uneven wear of the brake disc rotor, or foreign matter enters the solenoid valve.
Toyota has issued a Technical Service Bulletin BR012-06 on the topic.
It states: “When replacing the brake pads on an ECB (Electronically Controlled Brake) system equipped vehicle, retracting the caliper’s piston and installing new brake pads may cause trouble codes to set the next time the brake pedal is depressed.”
Code Clearing
If any of the following four trouble codes are set, all the codes need to be cleared and another test drive completed to verify the code has been cleared:
• C1341 Front Hydraulic System RH Malfunction;
• C1342 Front Hydraulic System LH Malfunction;
• C1343 Rear Hydraulic System RH Malfunction; or
• C1344 Rear Hydraulic System LH Malfunction. 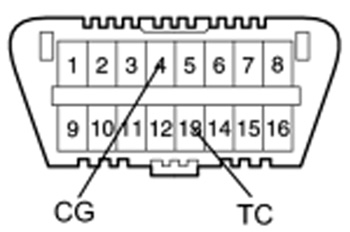
If you do not have a scan tool, it is possible to clear the codes with Special Service Tool (SST) 09843-18040 (Basically a fancy jumper wire).
(a) Using SST, connect terminals TC and CG of the DLC3. (See Figure 1)
(b) Turn the power switch ON (READY).
(c) Clear the DTCs stored in the ECU by depressing the brake pedal eight times or more within five seconds.
(d) Check that the warning light indicates a normal system code.
(e) Remove SST.
Note: Clearing the DTCs cannot be performed by removing the cable from the negative (-) battery terminal or the ECU-IG fuse.
Final Notes
In May 2008, Toyota announced that its worldwide cumulative sales of the Prius had passed the 1 million mark. Nearly 60% of all Prius sales have been in North America where 183,800 vehicles were sold in 2007. This is a significant opportunity for shops as the age of the hybrid fleet starts to age.
You will not have to wear insulated gloves and use rubber-coated tools to work on the brake system, but you will have to arm yourself with knowledge.