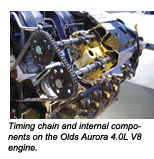
Some overhead cam engines in General Motors vehicles use timing belts to drive the cam (the 2.0L for example), some use chains (2.3L Quad Four, Cadillacs Northstar dual overhead cam 4.6L V8, the Aurora Northstar 4.0L V8 and Chevys Vortec 4200 inline six), and some use a combination of both (Chevrolets 3.4L V6). The rest of GMs lineup (2.0/2.2L, 3100, 3300 and 3800 V6; 5.0, 5.7L and 7.4L V8, etc.) are all pushrod engines that use a traditional timing chain and gear set to turn the cam.
To better understand the cam drives on some of these GM applications, lets take a closer look at a few examples to see whats unique or different.
 Belt Check
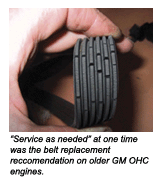
For starters, General Motors did not make a specific mileage replacement recommendation for many of its older belt-driven OHC motors. Service as needed was the only advice given in the repair manual. But most belt manufacturers recommend replacing the timing belts on these engines at 60,000-mile intervals. The only exception is GMs recommendation to replace the timing belt at 100,000 miles on the 1998 1.0L 3-cylinder Chevy Metro.
Determining the true condition of a timing belt isnt easy for two reasons. One is that most timing belts are hidden beneath covers that must first be removed to inspect the belt. The second is that a simple visual inspection wont necessarily tell you if a belt is good or bad. Some belts that look like new on the outside are dangerously weak on the inside and may fail without warning.
 If the backside of the timing belt is glazed or has a glossy appearance, it means the rubber is getting hard and the belt needs to be replaced. Another quick check is to push your fingernail into the rubber so see if it leaves a mark. If the rubber is too hard to leave a mark, the belt needs to be replaced.
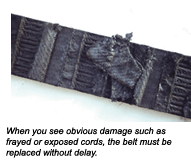
Any belt that shows obvious damage, such as frayed or exposed cords, damaged teeth, hunks of rubber missing, deep cracks, excessive surface cracking or cracks near the base of the belt teeth, should be replaced without delay!
A timing belt may also have to be replaced if it is making objectionable noise. Check pulley alignment and belt tension first. Also, if the belt shows sign of physical wear, check the condition of the pulleys. There should be no nicks, rough spots or other damage that could chew up the belt. If a pulley is worn or damaged, replace it.
Broken Belt
If the timing belt has failed, the engine obviously wont run because the camshaft wont rotate when the crankshaft turns. Consequently, you wont find any compression or vacuum. If the engine has a cam position sensor, a cam-driven distributor or an ignition pickup that triggers off the cam drive, you also wont find any spark either – which can make diagnosing a no-start confusing until you realize whats going on.
A quick way to confirm a broken timing belt on an OHC engine with a cam-driven distributor is to remove the distributor cap and see if the rotor moves when the crankshaft is turned by hand. Further confirmation can be made by removing the oil filler cap or a valve cover and watching for cam or valve movement when the crankshaft is turned. No movement would confirm your diagnosis of a broken timing belt. You can also remove the timing belt cover and check the belt, too.
 Time Slip
Sometimes a belt will jump one or more teeth, throwing off cam timing. If this has happened, the engine may still run but valve timing will be retarded causing low compression and vacuum readings. Ignition timing will also be retarded if the engine has a cam-driven distributor. If the belt is loose and you suspect it has jumped timing, check the alignment of the timing marks on the cam drive and crankshaft. Also check the teeth on the belt for wear or damage, and the belt tensioner adjustment.
On OHC engines where the water pump pulley tensions the timing belt, a failure of the water pump shaft bearing may cause enough loss of tension to allow the belt to jump time. So any time youre replacing a failed water pump on such an engine, dont assume cam timing is correct. Always check the timing marks to make sure the belt hasnt jumped time. This is especially important on engines that have balance shafts. A slipped belt can throw off balance, too, creating annoying vibrations and harmonics.
GM Timing Belt Replacement
The first step in replacing an OHC timing belt that is still intact is usually to rotate the crank until the timing marks indicate top dead center. On most engines, you want the number one piston at TDC on its compression stroke (not exhaust stroke) to get proper timing alignment. If the engine has ignition timing marks on the crank pulley, it makes the job easier. But you still might have to open the distributor cap or remove the valve cover to see if number one is on its compression or exhaust stroke.
Next, disconnect the negative battery cable from the battery. This will prevent anyone from accidentally cranking the engine and misaligning the timing marks.
Now you can begin to remove anything thats in the way of the timing belt. This includes any external drive belts, the timing belt cover and usually the crankshaft pulley. On many engines, you may also have to reposition some wiring and A/C, emissions or heater hose plumbing, remove one or more additional engine covers or splash shields, and loosen or reposition some external belt-driven accessories such as the A/C compressor, alternator, power steering pump or water pump to get at the belt.
Once youve uncovered the belt, confirm the alignment of the timing marks then follow the recommended procedure to loosen or relieve the belt tensioner and remove the belt. If the engine has one or more balance shafts, make sure the timing marks on these are correctly aligned too.
Inspect the belt cogs for signs of unusual wear that would indicate a damaged or misaligned pulley. If the cogs are chewed up, dont install the new belt until you have identified and repaired whats causing the damage. It makes no sense to install a new belt on an engine with one or more bad pulleys because it will doom the belt to early failure.
 Putting it Back Together
On some vehicles, you may have to use a special tool to hold the crankshaft and/or camshaft(s) in position while the new timing belt is being installed and tightened. On GMs 3.0L DOHC V6, for example, GM says to use a crankshaft holder tool (J42069-10) and camshaft holders (J42069-1 and J42069-2) or something equivalent to prevent movement while the timing belt is wrapped around the pulleys and tightened.
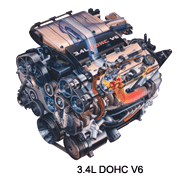
Some engines, such as GMs 3.4L DOHC V6, have a hydraulic tensioner that uses oil pressure to keep the belt tight. On these engines, the tensioner must be prepared before it is reinstalled by draining out the oil, fully retracting the plunger and refilling it with 5W-30 motor oil.
 When installing the new belt, use care not to nick, twist or squeeze the belt excessively while youre working it into place. Squeezing or crimping a belt to a small radius may damage the internal cords. Timing belts do not stretch, so never attempt to force one around a pulley. If the belt wont go on, something is misaligned or misrouted, or you have the wrong belt for the application (it happens!).
Once the belt is in place, make sure all the timing marks are in alignment, then install or adjust the tensioner so the belt has the correct amount of load. Automatic tensioners and hydraulic tensioners will apply just the right amount of pressure, but if you have to set belt tension manually, dont overdo it. Excessive tension puts added stress on the belt and pulleys and can lead to premature belt failure. Follow the vehicle manufacturers recommendations for belt tension and use a belt gauge to be accurate. In most cases, tension is checked between the two furthest pulleys.
As a final check, rotate the crankshaft twice and recheck the timing marks to make sure they are still in proper alignment. If everything appears to be OK, replace the belt cover and other components that had to be removed or relocated to finish the installation. Then place a label on the engine indicating the belt has been replaced and the odometer reading. This will alert other technicians that this service has already been performed. And should the vehicle rack up another 60,000 miles, it will serve as a reminder that the belt needs to be replaced again.
 Timing Chain Tips
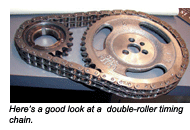
When replacing a timing chain on any GM engine, always replace the chain, camshaft and crankshaft sprockets. Dont reuse the old sprockets to save time or money. All three components wear as a system and should be replaced as a matched three-piece set. Some OHC kits also include chain guides and/or tensioners. These extra parts play a vital role in supporting the chain and keeping it tight and should also be replaced at the same time. This is especially important on an engine like the Northstar 4.6L V8 that has three timing chains and a bunch of guides and sprockets.
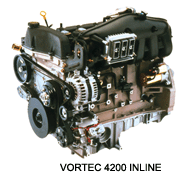
On GMs Vortec 4200 inline six (introduced in 2002 on the Chevy TrailBlazer, GMC Envoy and Oldsmobile Bravada), dual overhead cams are used to operate the valves (four per cylinder). One of the things that makes this engine unique is that it also has variable valve timing (VVT). The VVT phaser unit is mounted on the end of the exhaust camshaft and uses oil pressure to change exhaust valve timing up to 25 degrees. The VVT unit is controlled electronically by the powertrain control module via a solenoid valve that opens to route oil pressure to the unit. When replacing the timing chain on one of these engines, you have to make sure the VVT unit is in the correct position (fully advanced).
Chevy 262 Timing Gears
Chevy has used three different timing gears for the 262 V6 since it first appeared in 1985. The flat tappet engines use a P/N 340235 gear, the non-balancer, roller cam engines use a P/N 12552128 gear, and the balancer engines use a P/N 10144121 gear. None of these gears are interchangeable.
 On 1992-98 262 engines with balance shafts, make sure the two balance shafts are correctly phased with the camshaft. The shafts are gear-driven off the cam, and there are two different gear sets, one with wide teeth and one with narrow teeth. The wide teeth gears were used on the earlier engines, and can be replaced with the later narrow gears to reduce noise.
Chevy LT1 Timing Gears
Two different timing gears have been used in this engine, too. The earlier 1992-95 LT1 engines with aluminum heads use a P/N 10128349 cam drive gear with a small hole with 16 splines in the center. On 1995 and later LT1s, a different gear (P/N 10206039) with a larger, unsplined center hole is used.
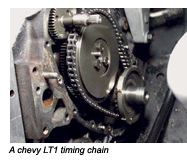 Youll also find three different front covers on these engines. The 1992-94 engines have a cover with two small holes for the water pump and distributor drives, and a large hole for the crank. The 1994-95 engines have a large center hole for the distributor, and the 1996-97 covers have an extra hole at the bottom for the crank position sensor.
Be careful when installing the distributor shaft on the early engines because it is reversible. If you install it backwards, it may pump oil past the front cover seal. Its also a good idea to inspect the seal surface on the water pump drive shaft when changing the timing gears and chain on an LT1. The water pump is driven off the cam on this engine, and if the shaft is worn, it will leak.
Buick 3300 Timing Chain
The Buick 3300 V6 is a pushrod engine with a conventional timing gear and chain set. The engine was introduced in 1989 and underwent a number of production changes over the next several years. On the early engines (1989-90), the cam gear is held on with three small bolts. But on the 1991 and later engines, the cam drive was changed to a single large bolt on the cam drive gear. The two different drives are not interchangeable, so make sure you have the right timing gear and chain set when working on one of these engines.
The same goes for the camshafts. The early cams had a large flange on the front end with a dowel pin and three bolt holes for the timing gear. The later cams have no flange and have an extended snout with a large threaded hole for the timing gear.
Another change to watch out for on the Buick 3300 is that the flange on some of the earlier cams came in two different thicknesses. The thinner ones are knurled on the outside diameter and must be used with the correct shims otherwise the timing chain will not line up properly with the cam gear.
| TIMING REPAIR TIME On most of GMs front-wheel-drive cars, there isnt much clearance between the timing belt end of the engine and the strut tower or inner fender panel. That can make changing the belt difficult. The average flat rate labor time on most OHC engines is about 2.5 hours, with the majority of engines falling somewhere in the 2.0- to 3.0-hour range. But there are exceptions. GMs 3.4L DOHC has a labor time of 4.5 hours to change the timing belt! |
| CAUTION: If the timing belt has broken and the engine is an interference engine, such as the 1996 3.4L DOHC V6 or Cadillacs 3.0L V6, that does not have enough clearance between the valves and pistons to prevent contact if the belt fails, do not crank the engine or rotate the crankshaft or camshaft as doing so may only cause further damage. On an interference engine with a broken belt, youll probably have to pull the head and inspect the valves and pistons for damage before replacing the belt. |
| TENSIONERS & IDLER PULLEYS If youre replacing a timing belt, you should also replace the belt tensioner(s) and idler pulley(s), too. Why? Because these parts are often worn and will cause problems down the road if they are not changed. Timing belt tensioner and idler pulley bearings are sealed for life and are not serviceable. So theres no way to clean, inspect or relubricate the bearings when you change the timing belt. Over time, the grease inside the bearings breaks down and oxidizes, accelerating bearing wear and increasing the risk of a bearing failure or seizure. And the hotter the operating environment, the shorter the lifespan of the grease and the bearings. The location of the tensioner and idler pulley under the timing belt cover prevents them from receiving much cooling, so they tend to run quite hot. Noise is usually the first symptom of a tensioner or idler pulley that is failing. If the problem isnt fixed, the bearing may seize causing the timing belt to jump time, slip or break. |


