Over the years, Honda has used a variety of different ABS systems on its vehicles. In fact, one of Honda’s earliest ABS applications dates back to 1988 on the Acura Legend. The majority of new models are using Teves ABS systems. One of the systems used during the 1990’s was the Sumitomo ABS system, which was used on the 1992 Acura Integra, Legend and Vigor models, and Honda Accord.
Like most ABS systems from this era, the Sumitomo ABS system is an “add-on” non-integral ABS system that uses a conventional master cylinder and vacuum booster. The main components that make up this system are scattered all over the car. The ABS modulator is located in the engine compartment on the passenger side just aft of the strut tower. The ABS “power unit,” which consists of a pump and high pressure, nitrogen-charged accumulator, is located in the lower right front area of the engine compartment.
The ABS control unit is up front under the dash on the passenger side. On the same year Honda Accord, the control module is located behind the rear seat on the passenger side.
How it Works
The Sumitomo ABS system in the 1992 Acura models is a four-wheel ABS system with wheel-speed sensors at each wheel. But it’s a three-channel system that controls both rear wheels as a pair. So there are separate ABS solenoids in the modulator for each front wheel, but only one ABS solenoid for the rear brake circuit.
 When ABS braking is needed, the control unit energizes the normally open solenoid outlet valve in the modulator. This closes the reservoir outlet circuit valve and opens the pump supply to the modulator. Pump pressure enters the modulator and works against the control piston, which closes a cut-off valve in the brake circuit. Pressure is then released from the brake circuit so it can flow back to the reservoir (which also produces pedal feedback for the driver). Pressure is reapplied to the brake when the solenoid is de-energized. This allows the control piston to return to its normal position, opening the brake circuit cut-off valve.
When the ignition is turned on, the ABS control module energizes the pump relay to start the pump if the accumulator pressure switch indicates low pressure. The pump draws fluid from the master cylinder reservoir and feeds it into the accumulator. When accumulator pressure reaches maximum pressure, the pump shuts off. The pressure stored in the accumulator is now available for ABS braking if needed.
Here they Come
By the time a vehicle is 10-years old and has been driven more than 100,000 miles, it can experience a variety of ABS-related ailments. Most will be related to the wheel-speed sensors, ABS modulator assembly, pump and accumulator.
Like other ABS systems, the ABS light on the Honda and Acura applications should come on for a few seconds when the ignition is first turned for a bulb check. If there are no faults, the light should then go out. But if there is a problem, the ABS light will remain on and the ABS system will be temporarily disabled.
The ABS warning lamp will remain on if any of the following conditions exist:
ABS pump motor runs continuously for more than two minutes (usually indicates low brake fluid level or a bad accumulator).
Car is driven more than 30 seconds with parking brake engaged. The brake warning light should also be on.
A wheel-speed sensor fails to send a signal when the vehicle is moving.
The operation time of any ABS solenoid valve exceeds a preset value and the ABS control unit detects an open circuit in one of the ABS solenoid circuits.
When the output signals from the ABS control unit are not transmitted to the ABS solenoid valves.
When temporary loss of traction occurs as a result of excessive wheel spin when stuck in mud or snow (drive wheels spin for 20 seconds or more) or when driving on extremely rough roads. This may mislead the system into thinking something is wrong and set a wheel-speed code. The only thing that’s wrong here is Honda’s diagnostic strategy. Cycling the ignition on and off should reset the ABS system and turn the ABS warning lamp off.
Low battery voltage. Check the battery. If low, recharge it and, with the key off, remove ABS fuse #2 for three seconds to clear the fault code. Reinstall the fuse and turn the ignition on. The ABS warning lamp should now go off.
 Tactical Tips
If the ABS warning lamp does not come on when the ignition is first turned on, the bulb may be burned out, there may be a wiring problem or the ABS control module may have a bad ground or have failed. There’s a yellow wire that runs from the fuse panel to the instrument panel for the ABS warning lamp (refer to the owners manual for the proper fuse location because it varies depending on the model), and a blue/red wire that runs from the instrument panel to the ABS control module (terminal #4 on the Integra or terminal #10 on the Legend). If these circuits are OK, check the ABS control module connector and ground connection for looseness or corrosion.
If the control module is receiving voltage when the key is on, but is not illuminating the ABS warning lamp circuit for the initial bulb check, the module is defective and must be replaced.
Accessing Codes
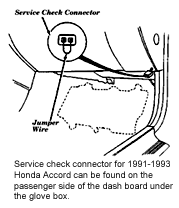
To access the codes if the ABS warning lamp is on, find the ABS service check connector under the passenger side of the instrument panel. It has a two-wire connector on the end.
Connect a jumper wire between the two terminals (key off). When you turn the ignition on, any diagnostic codes that are stored in the ABS control module’s memory should make the ABS warning light flash within 10 seconds.
The first series of flashes corresponds to the first digit of the code (which Honda refers to as the “main code”). After a one second pause, the light will flash out the second digit of the code (which Honda refers to as the “sub code”). If more than one code is stored, a five second pause will be followed by a single flash of the light, followed by another five second pause before the next fault code is displayed.
After all codes have been read, the codes can be cleared by removing the ABS module fuse for at least three seconds (key off).
Tool Time
For these older Honda Sumitomo ABS applications, Honda has a special dealer tool (07HAJ-SG0010A) that plugs into a six-pin connector under the front passenger seat. The tester talks to the ABS module and can be used to perform various diagnostic tests. If you can get your hands on one of these dealer tester tools, you can use it to perform six different mode tests that check the operation of the various solenoids in the hydraulic modulator assembly.
 Unfortunately, the Honda ABS tester costs $1,000 so it’s unlikely many independent shops will buy such a tool unless it’s an import shop or they do a lot of Honda work. So depending where you go following graduation, you might not use this tester.
But don’t worry, there are various aftermarket scan tools that can read ABS codes on newer Honda and Acura models. However, we’re not aware of any that can plug into these older systems. One manufacturer has a cartridge for its scan tool that allows these units to read ABS codes on 1994 and newer Honda and Acura cars. But the scan tool software can’t cycle the solenoids or do the same tests as the dealer tool.
In most cases, you don’t really need the Honda ABS tester or a scan tool to figure out what’s wrong – assuming you know something about ABS systems and how to troubleshoot wiring circuits.
Who’s at Fault?
Most of the faults you encounter will probably be in wheel-speed sensor circuits, the ABS modulator solenoids, pump motor or relays. In many cases, the problem may be nothing more than a blown fuse, loose or corroded wiring connector or a bad ground connection (especially between the pump motor and body). Relays are also likely to cause trouble after many years of service.
If you find a wheel-speed sensor code, check the wiring continuity between the sensor, connector and wiring harness.
Sensor resistance can be checked with an ohmmeter at the sensor or through the harness. Refer to a manual for the exact specs, but as a rule the front sensors on the 1992 Acura applications should read 750 to 1,200 ohms, and the rear sensors 1,100 to 1,600 ohms.
If a wheel-speed sensor’s resistance is within normal range, remove the sensor and inspect it for damage or metallic debris sticking to the tip. Wheel-speed sensors are magnetic and will attract wear debris from the rotors and brake pads. As this stuff builds up, it reduces the strength of the signal produced by the sensor. Also, inspect the condition of the teeth on the WSS sensor ring (which Honda calls the “gear pulser”). A layer of rust on the teeth or nicks or damage to the teeth can prevent the wheel-speed sensor from generating a good signal.
The air gap between the wheel-speed sensors and their rings is also critical. For Vigor models, the front air gap should be .024 to .035 inches, and for the rear sensors it should be .020 to .035 inches. Use a nonmagnetic feeler gauge to adjust the gaps as needed.
If you find a code for a ABS solenoid valve, the resistance between the solenoid terminals can be checked with an ohmmeter. As a rule, you should see about one to three ohms if the solenoid is good. A zero reading would tell you the solenoid is shorted, while an infinite reading would tell you it is open. If a solenoid is bad, the entire ABS modulator unit has to be replaced (list price $927) because the individual solenoids are not available as separate components.
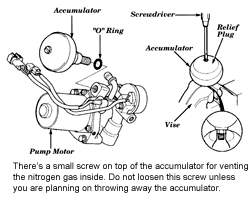
A code 1-3 for the pump motor may indicate a failure to build up pressure because the fluid level is low or there is air in the system. There’s a special “maintenance bleeder valve” under a red cap on the modulator that must be opened to relieve pressure inside the modulator any time the modulator, pump or accumulator is serviced. Honda has a special T-handle wrench (07HAA-SG00100) that can be used for this purpose. To relieve pressure, turn the bleeder screw one complete turn (key off), then stop. Wait until the pressure is relieved, then close the screw.
If air is trapped inside the ABS modulator, the maintenance bleeder screw can also be used to vent air. But if there’s a lot of air inside the solenoid valves, the system will have to be bled using the special Honda ABS tester tool to cycle the solenoids. If you don’t have this tool, another method is to manually cycle the solenoids while bleeding the system with a pressure bleeder. To do this, you need a wiring diagram to figure out which terminals on the wiring connector can be jumped to cycle each solenoid one by one.
Topping the Charts
The Honda diagnostic charts for the Sumitomo ABS system list various procedures for isolating faults if there’s a code for the pump motor, accumulator, pressure switch or solenoids. Some of the tests involve removing and bypassing the pump relay with jumper wires to check pump operation and the ability to build and hold pressure. If the pump is pushing fluid towards the accumulator, but fails to generate enough pressure, the problem may be a leaky or discharged accumulator or a bad pump check valve. If the system fails to hold pressure once maximum pressure is reached, the problem is most likely a leaky solenoid valve in the modulator.
Note: If you have to remove or replace the accumulator for any reason, be sure to relieve system pressure by turning the maintenance bleeder screw (under the red cap on the modulator) before you do anything else. If the accumulator needs to be replaced, there’s a small screw on top of it for venting the nitrogen gas inside. Do not loosen or turn this screw unless you are planning on throwing away the accumulator because once the gas escapes out of the accumulator it is history.
One more thing
As for maintenance, Honda recommends replacing the brake fluid every 30,000 miles and replacing the ABS high-pressure hose that runs from the pump to the modulator every 60,000 miles. Since neither has probably ever been done, it’s a good idea to do both if you have to replace the pump, modulator or master cylinder.
’92 ACURA ABS DIAGNOSTIC CODES
| 1 | Pump motor |
| 1-2 | Pump motor circuit |
| 1-3 | High pressure leakage |
| 1-4 | Pressure switch |
| 1-8 | Accumulator gas leakage |
| 2-1 | Parking brake switch |
| 3-1 to 3-8 | Pulsers (wheel-speed sensor installation) |
| 4-1 | Right front wheel-speed sensor |
| 4-2 | Left front wheel-speed sensor |
| 4-4 | Right rear wheel-speed sensor |
| 4-8 | Left rear wheel-speed sensor |
| 5-4 | Right rear wheel-speed sensor (modulator or brake drag) |
| 5-8 | Left rear wheel-speed sensor (modulator or brake drag) |
| 6-1 | Front fail safe relay |
| 6-4 | Rear fail safe relay |
| 7-1 | Right front ABS solenoid |
| 7-2 | Left front ABS solenoid |
| 7-4 | Rear ABS solenoid |