Mercedes-Benz vehicles are among the most advanced cars on the road. Repairing these vehicles can be challenging, but not impossible. Mercedes opts to control most of their vehicle systems by electronic means, but the mechanical components are much like those found from other manufacturers.
Automatic transmissions are a good example of this. Take away the control modules, CAN-BUS interfaces, and fancy electronic gadgets and you’re left with a few planetary gearsets, clutches, brakes and solenoids.
It’s also worth noting that Mercedes transmissions can be found in some Dodge and Jeep vehicles from the Daimler Chrysler era, so it’s almost inevitable that you’ll see one of these vehicles in your shop at some point.
Mercedes-Benz requires that only fluids which meet their specifications may be used. These specifications include (but are not limited to) MB 236.10 (OE part: 001 989 2103) or MB 236.12 (OE part: 001 989 4503). If you are using an alternative oil, be sure to check the label for these specifications. You can also use a resource such as MB BeVo-ONLINE to find alternatives to the OEM oil which is still Mercedes-Benz approved.
As for the maintenance interval, Mercedes-Benz doesn’t specify that in their service tables. We would suggest that you inspect the fluid level, color, smell, whenever servicing one of these vehicles. Replacing the filter and the fluid at the same time will help to extend the life of the transmission for the customer.
Today we’re going to take a closer look at the 722.6 5-speed automatic transmission, also known as the 5G-Tronic or the NAG1. This transmission was found in Mercedes vehicles starting around 1996. It can also be found in some Dodge, Chrysler, Jeep, Porsche and Jaguar vehicles. This transmission was found in certain high-performance applications including the SL65 and the SLR McLaren thanks to its ability to handle high torque output. Despite its strength, this unit has been known to have a few common issues, let’s take a closer look.
Let’s talk about the tools and equipment you’ll need to have on hand, as well as some common service procedures before we get into specifics on the transmissions themselves.
Tools & Procedures
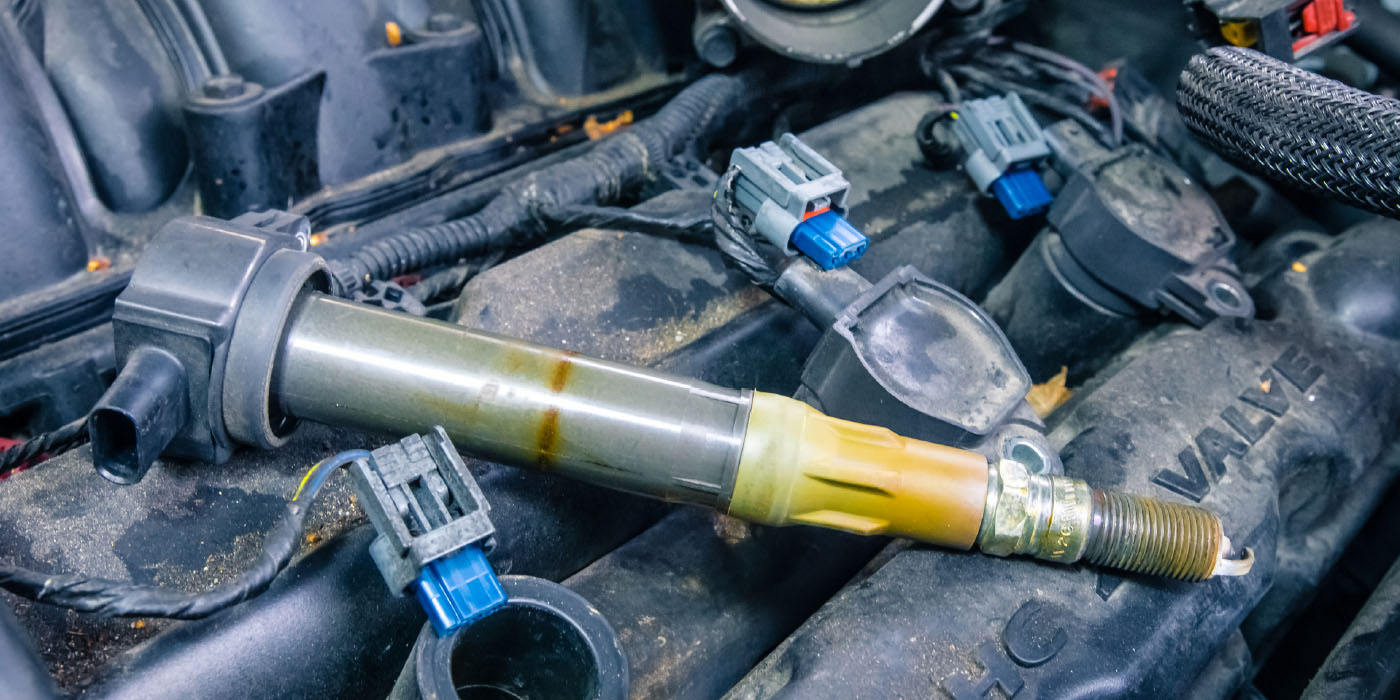
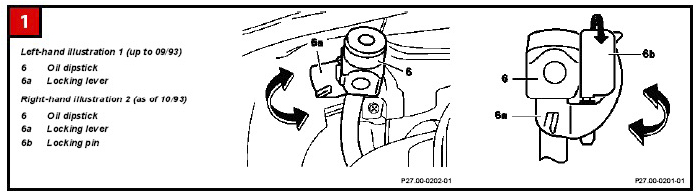
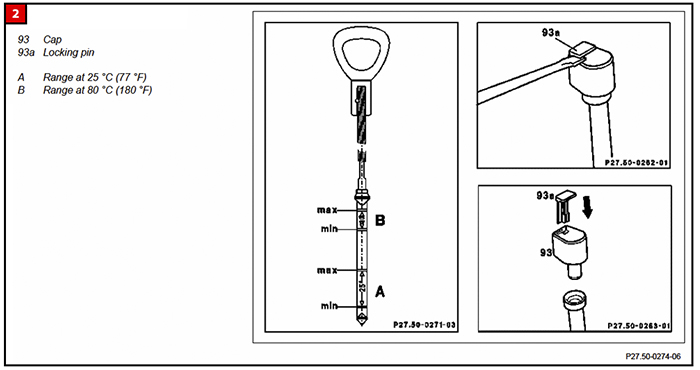
We’ll begin with the most surprising thing about these transmissions for those who haven’t worked on them; you can’t check the transmission oil level. That is, you can’t check the oil level without purchasing a dipstick. Mercedes-Benz intended to keep these transmissions “sealed for life”, so they installed locking caps on the top of the dipstick tube instead of a dipstick (Figure 1). (Photo)
Mercedes dealerships stock these dipsticks in their shops for technicians to use. This seemingly odd practice prevents customers from potentially damaging the transmission by adding the wrong type or quantity of oil to the unit. However, it makes it difficult for those of us in the aftermarket to do our jobs effectively. Luckily these dipsticks are very inexpensive and plentiful online, they’re more of a nuisance than a hinderance. Don’t forget to install a new locking cap on top once your work is complete (Figure 2).
You’ll need to have a scan tool capable of communicating with the vehicle systems. Dealerships will have the Star Diagnostic Scanner (SDS) which utilizes Xentry diagnostic software. Companies such as Launch, Autel, TopDon, OPUS IVS and CanDo all have tools which can perform many of the bi-directional tests, adaptations and programming as the factory unit.
Refilling the transmissions with oil can be a bit of a challenge. Depending on which transmission you’re working on, you may need to add the fluid from the top of the dipstick tube or from below using special equipment. We’ll go into more detail about this later. Keep in mind that if you’re adding fluid from above, you’ll need to work slowly to keep the oil from overflowing onto the bell housing.
Shifter Difficult to Move or Engage Park
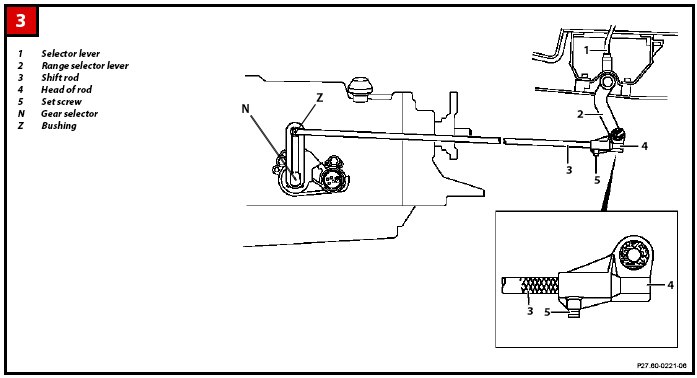
If a customer comes in saying that they have trouble getting the shifter into PARK, there may be two possible causes. Start by checking the bushing on the front of the shift rod where it connects to the transmission (Z in Figure 3). These bushings tend to dry out over time, crack apart and eventually fall out completely. This will prevent the linkage from fully engaging PARK on the gear selector.
Transmission Connector Oil Intrusion (TSB LI27.00-P-044918 Version 1)
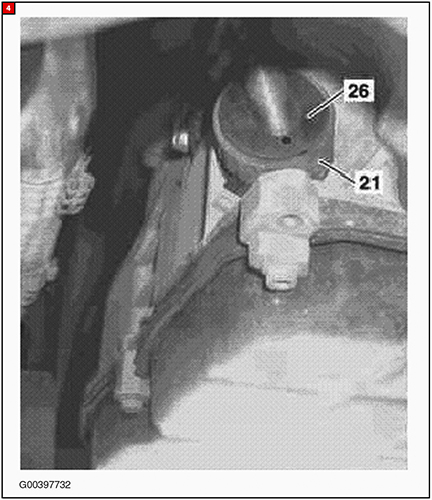
If a vehicle comes in with a complaint of erratic or harsh shifts, and a multitude of trouble codes are stored in the TCM, check the electrical connector on the front LH side of the transmission for signs of oil intrusion (#26 in Figure 4 below).
The harness connects to the conductor plate through the pilot bushing. The pilot bushing has two O-rings which are meant to protect the electrical connection from the oil. These O-rings may leak causing oil to fill the connector cavity and travel through the wiring harness up to the TCM.
To fix this start by disconnecting the negative battery terminal, then clean both sides of the harness with electrical contact cleaner. Replace the pilot bushing on the transmission (#21 in Figure 5 below). Be sure to completely dry out the harness ends before reconnecting them.

If oil is found inside the harness at the TCM connection, remove the module from its plastic housing. Carefully clean the module with an appropriate electrical contact cleaner and dry it thoroughly.
Reassemble the vehicle, clear the trouble codes and perform a road test. If the problem persists, it’s possible that the TCM was damaged by the oil intrusion.
TCC Shudder/Judder
Our friends over at Transmission Digest have talked about this issue in the past. A customer may bring their vehicle in with a complaint of TCC judder, but it doesn’t feel like the typical shudder or chatter, but more like a vibration. The cause of this can be valve body bore wear (Figure 6).
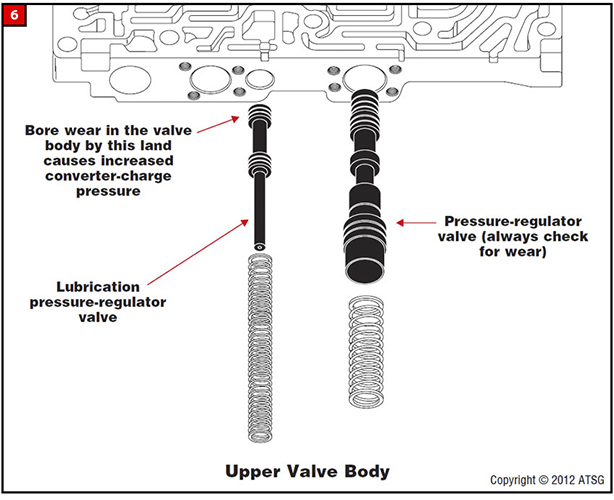
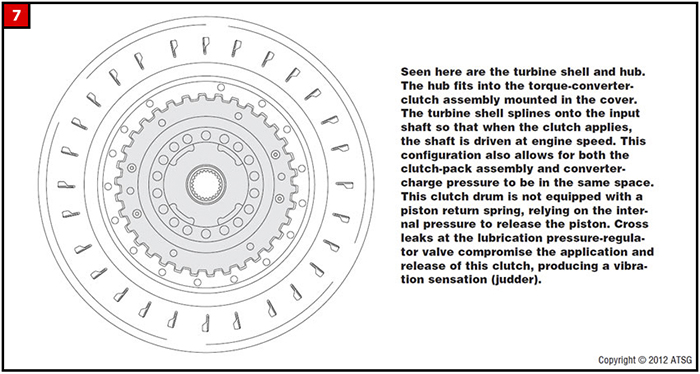
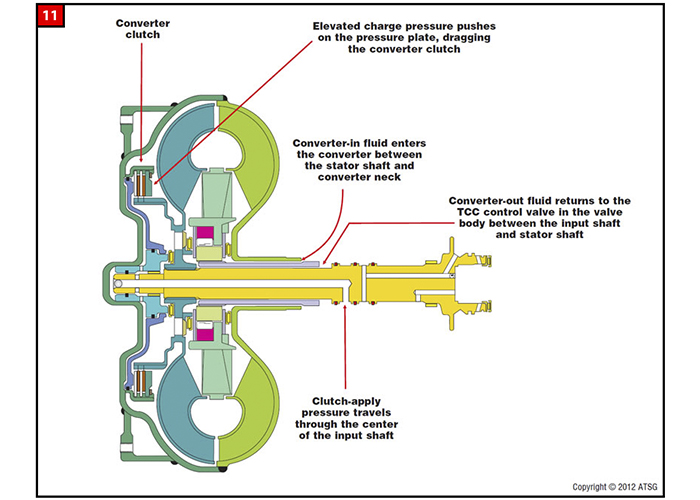
The torque converter lock-up is handled by a multi-disc wet clutch pack. The clutch drum is not equipped with a piston return spring, so it relies on the oil control system to release the piston (Figure 7).
The solution is to recondition the valve bore using a suitable repair kit. These kits include an oversized valve which is installed after the bore has been machined. Always remember to reset the adaptations in the transmission control module (TCM) before returning the vehicle to the customer.
K2 Friction Plates
Let’s say your customer comes in with a slipping transmission. You sell a transmission rebuild, remove the unit and send it out for the rework. You get the transmission back from the rebuilder, install it and now it’s exhibiting gear bind or slipping in third gear. Where do you start?
These transmissions are used in a wide range of vehicles from the 4-cylinder C-Class to the V12 SL65 AMG. The big difference is the internals, namely the clutch packs and the planetary gearsets. There have been reports of transmissions being rebuilt using the incorrect K2 friction plates. These places come in two different inside diameters, but they share the same outside diameter and tooth configuration (Figure 8).
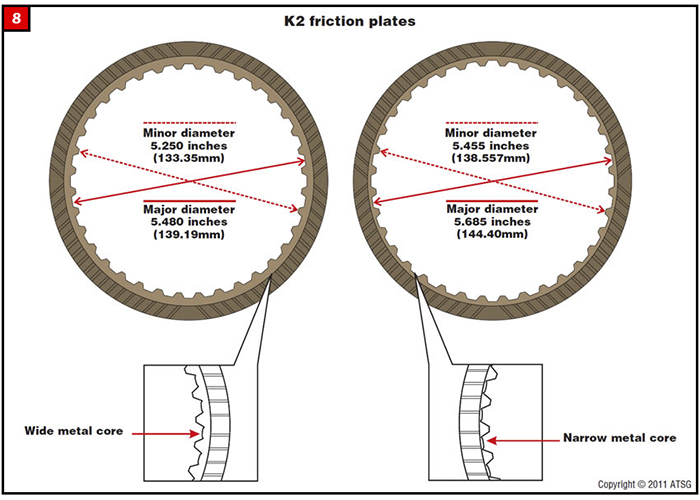
The difference in inner diameter is due to the size difference between the three-pinion and four-pinion carriers (Figure 9 & Figure 10). If the vehicle is assembled with the wrong friction plates the customer may experience gear bind or slip in third gear, and the transmission may go into failsafe or “limp mode”.
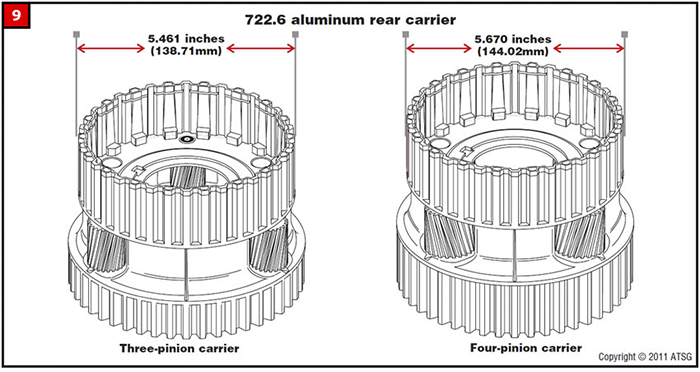
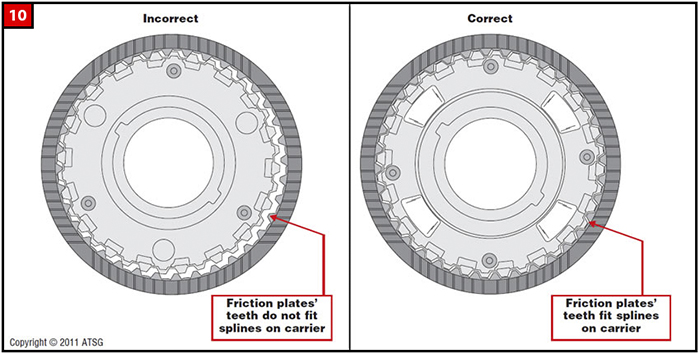
In this case the rebuilder likely used an incorrect rebuild kit. The solution is simple, be sure to fit friction plates with the correct inside diameter for the carrier found inside that transmission.
Downshift Shudder, Cold-Stall Condition
This final example is from a 2007 Dodge Charger equipped with a multi-cylinder displacement system. The vehicle had been to four other transmission shops which all failed to remedy the issue. This same sort of concern can be applicable for many late-model vehicles regardless of their make.
Downshift shudders are commonly caused by the TCC piston not returning once applied (Figure 11). Adding piston return springs can fix this issue, and the shop sold that repair and a transmission rebuild to the customer. When the Charger was put back together the cold-stall condition was no longer present, but the shudder was still there.
After lots of second guessing and several different shops looking at the vehicle, one technician noted that the condition could be eliminated by placing the shifter into the auto-stick (manual shift) mode. In short, the MDS system deactivates four of the V8 cylinders during closed throttle operation or at steady speeds – including coastdown – and the system is not active when the shifter is in auto-stick mode.
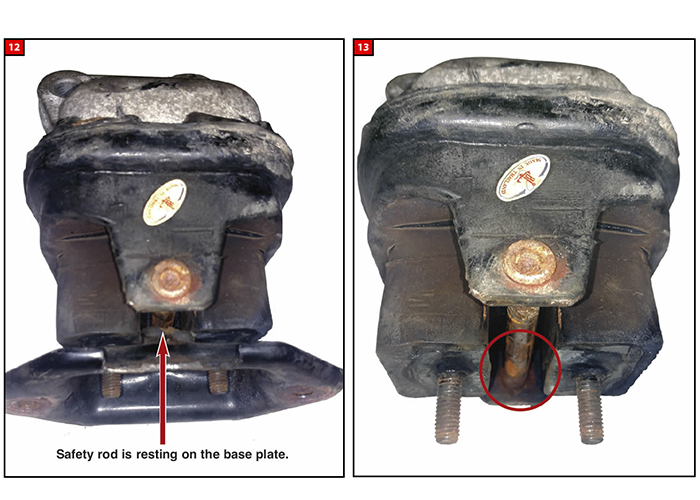
In 2014, ATSG published an excellent bulletin (14-W22) about this condition. In summary, the engine mounts isolate the torque converter lock-up vibrations from the vehicle cabin. But as the mounts wear, they begin to sag. If they’re not replaced, they can get to a point where the safety rod will contact the base of the mount and transfer the vibrations directly to the chassis.
When the mount is together it is difficult to see the problem (Figure 12). When the mount is in the vehicle, the sag is even more difficult to see. It takes a high intensity light and a mirror to make detection possible. When the mount is separated, you can see witness marks where the safety rod contacted the base plate (Figure 13).
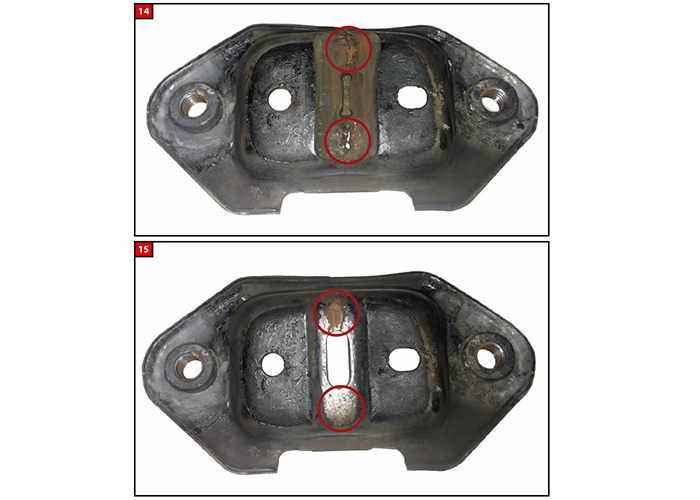
When you look at the base pate of the mount, you can see that the safety rod has damaged the rubber pad (Figure 14). The metal-to-metal contact is exposed when the pad is removed (Figure 15).
When diagnosing a shudder condition on a vehicle equipped with a 722.6 transmission and an engine with an MDS system, always qualify the shudder by placing the shifter into the auto-stick mode. Don’t forget that the mount does not have to be separated or broken to cause the shudder condition.
Torque Converter Replacement
Wrapping up this list is the torque converter itself. The torque converter in this transmission uses a wet clutch system for lock-up. That means that the clutch performance is subject to the condition of the fluid inside the transmission.
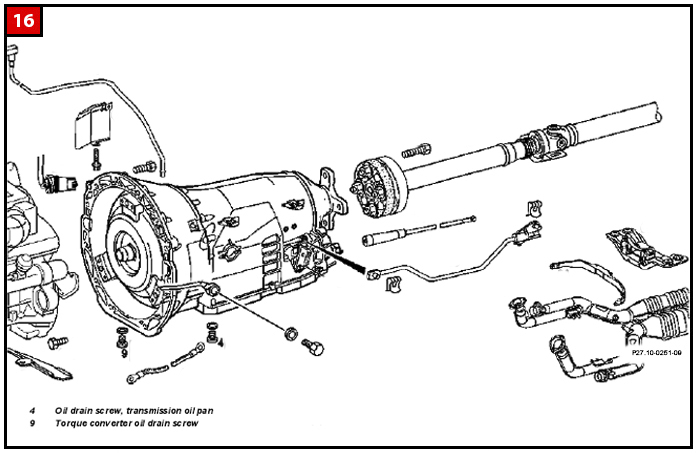
Don’t forget to drain the torque converter (#9 in Figure 16 below) if you’re replacing the transmission fluid. It is a good idea to inspect the torque converter whenever the transmission is removed. If the transmission is to be rebuilt be sure to rebuild or replace the torque converter as well. This will help to maximize the service life of both units.