By: Craig Chaffee, Training Manager for Automotive Aftermarket
It is no secret that to make a profit, paint jobs need to be done right the first time – especially important in these tough economic times. In my experience when things go wrong, nine times out of 10 the problem is usually the preparation. If not done correctly, it results in costly rework.
Paint preparation involves much more than simply matching the paint and assembling the gun. By the time the car goes into the spray booth, significant labor has already been dedicated to fixing the defect for a blemish-free surface. The preparation team typically devotes one to five hours on sanding, repairing and masking before the paint technician even loads paint in the gun. Compared to the preparation team’s labor, the actual spraying time is minimal.
Because the paint itself is expensive and the paint technician is typically the most experienced worker within the body shop, it is critical that the vehicle is properly prepared to protect the time and material investments already made. The following recommendations will ensure a body shop’s paint job is efficient and profitable. 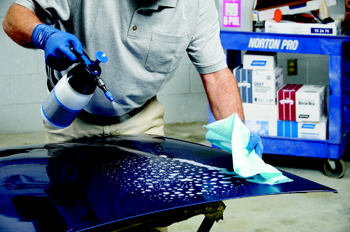
Body Prep
The finish will only be as smooth as the surface it covers so the first step is to properly repair the defect. Always begin body preparation by cleaning the panel, first with soap and water and then with a wax and grease remover.
Whether working with a small defect or a pre-primed replacement panel, sanding is essential throughout the body preparation stage. Starting with 36 or 50 grit on a grinding disk, grind an area larger than the defect and then switch to 80 grit to feather the edges. The finer the edges are feathered, the less chance of shrinkage later. To minimize filler use, hammer and dolly the defect to tap down high or low spots.
The next step is spreading the filler onto the sanded area. Wait until the applied filler hardens and then roughen the filler by using 40 grit on a board file. Proceed to an 80-grit file and then remove sanding dust from the cracks with clean, dry air. This will ensure an easier inspection of coarse sand scratches, pinholes and low spots.
A good tip is not to use polyester filler on top of the original filler. If you spot any pinholes or scratches, use the same product or finishing putty to add a very thin layer and repeat the sanding process after curing.
To further improve the finish and ensure adhesion of the repair material, feather edge the surrounding area using 80 or 100 grit DA. 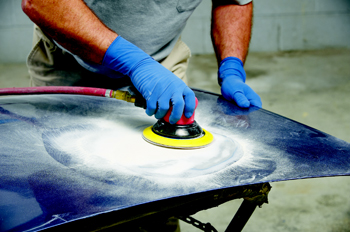
To prevent solvent penetration under the edge of the repair area, apply a skim coat of putty or glaze to the entire area and about one to two inches beyond, depending on the size of the repair.
Once the spot putty is applied, use 180 grit with a DA, progressing to 220 and then 320 grit. The sand paper becomes finer throughout the process to eliminate heavy scratches into which the primer would sink. When sanding is completed, blow again with clean, dry air and perform a final sweep for the same imperfections noted above.
Bumper Structural Repair
Structural repairs are needed when the defect penetrates the surface. After washing with soap and water, use a non-solvent degreaser to remove oil and road grime. Then sand the backside of the tear with 80 grit, extending about two inches around the actual hole to ensure adhesion of the repair material.
 Instead of adding another chemical to clean the sanded area, blow off the area with dry air. Then tape the front side of the panel so the material doesn’t ooze through the tear. Apply the adhesion promoter and wait ten minutes or flash off with a heat gun, making sure not to overheat the part.
The next step is to bead the adhesive around the edge and then affix the reinforcing tape one inch beyond all edges of the damage. Spread the adhesive evenly with the surface and apply pressure to make sure the patch has ample contact and air pockets are eliminated. When the adhesive is cured, the front tape can be removed to begin the cosmetic repair.
Bumper Cosmetic Repair
If the damage does not penetrate the bumper cover, you may proceed directly to cosmetic repair. First clean the repair area with soap and water, then a non-solvent based cleaner, and dry thoroughly. Next, sand the repair area with 80 grit on a DA or grinder and blow off the area with clean, dry air. A good rule of thumb is to use low revolution sanding as it is crucial to prevent any melting of plastic, which results in poor bond adhesion.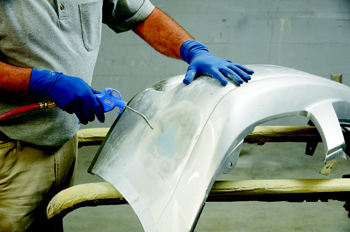
The next step involves applying the repair material. Depending on the material, you may first need to apply adhesion promoter on the damaged area. Following the material manufacturer’s instructions, apply the flexible repair material to the prepared area.
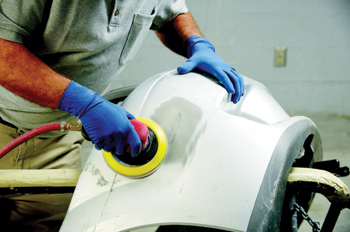
Allow the repair material to dry for 15 to 20 minutes (refer to manufacturer’s instructions) and then sand the cured material with a DA sander or by hand with 180 grit. Complete the sanding process by feathering the edge with 320 grit. If there are any pinholes, re-apply a very thin skim of the same product (don’t layer polyester filler on top) and resand with 320 grit after the product has cured. Next, blow with clean, dry air and the repair area will be ready for primer.
Body Structural Repair
When using body filler, apply it to the dented area and then sand down to the correct shape, as indicated previously. Layer primer over the body filler and sand with 80 grit, progressing to 180 or 320 grit (depending on the primer manufacturer’s recommendation to remove imperfections) before applying base cast or color.
If the damage is too large to repair, a replacement panel is required. Most are delivered pre-primed or e-coated, but it will still need sanding. If replacing a door with a new door skin, scuff the panel before and after to blend the front and rear panels.
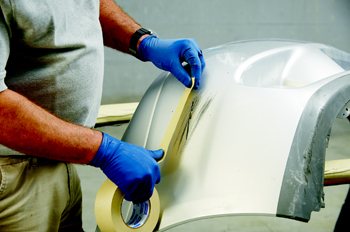
Masking
After the defect is repaired, the next step is masking the vehicle to protect the rest of it from overspray. From panels to windows to door jambs to lights and tires, every square inch not designated for paint needs masking with tape or plastic sheeting. Foam tape is recommended to prevent paint from penetrating jambs, hood and trunk gutters, as well as to produce a soft paint edge. An additional advantage of foam tape over masking tape and paper is that it increases productivity and saves on material costs.
To protect windows and lights within the spray area, first layer with fine line tape on difficult contours and then use masking tape and paper.
Next, outline the spray area with three-quarter-inch masking tape, cover the entire vehicle with plastic sheeting, and cut out the area to be sprayed. Use masking tape to attach the plastic along the cut edge to the tape outline. Cover exposed wheels with paintable plastic wheel maskers. Also consider reverse masking the wheel wells with 18-inch masking paper, which will keep the dirt behind the wheel and out of your paint jobs. This will keep the paint area cleaner and save time and money with costly rework.
The final step is to double check if any areas outside of the spray area are exposed.
Paint Cup Systems
Once body preparation, structural repairs, and masking are completed, the vehicle is ready for the paint shop where the technician must assemble the paint cup system and get the spray gun ready to use.
When selecting a paint system, body shops have a choice between reusable and disposable cups. With the market shifting ever more towards the waterborne movement, paint manufacturers are pushing for plastic because the water rusts metal cups.
Disposable cups also require less cleaning and storage, eliminating the solvent and labor costs necessary for reusable cups. Less time is spent cleaning the cup and gun, and paint can be stored in the disposable cup for future use. Remaining paint in a reusable cup is either wasted by being thrown away or transferred into another cup for storage, which requires additional labor and thus, cost. Savings with the disposable cup are estimated to be one-third the cost of its reusable counterpart. The following are tips for assembling such a disposable system.
Begin by threading the correct adapter to the spray gun to convert it to your paint system. Next, seat the ring into the cup and insert the liner into the ring.
The following step is loading the paint, measuring either by weight or mixing-ratio scales pre-printed on the cup. Using the procedure recommended by the paint company, mix the paint by shaking or manually stirring. After shaking, make sure to check the lid and tighten if needed.
After mixing the paint and fastening the lid, mount the cup on the spray gun. Then connect the air line to the gun and adjust the spray pattern.
Final Steps
The new paint job never matches perfectly with the original factory finish. To help blend the new and old panels, scuff the panel before and after spraying with clear coat. When the paint dries, the final step is to identify surface defects, including paint runs and sags, orange peel, and poor coverage. Some of these, such as orange peel, only require buffing to even out the surface.
However, the likelihood of starting from scratch increases if the preparation work is not properly executed. No matter how experienced the paint technician is, the final result heavily depends on the skills of the preparation team. The paint itself is costly and if the job needs to be completely redone due to poor preparation, wasted labor and product could double the cost to a shop.
Source: Norton Abrasives, a brand of Saint-Gobain