The Trick To Tricky Cap Screw/Bolt Installations -

The Trick To Tricky Cap Screw/Bolt Installations

Taking things apart is generally never an issue, but taking them apart without destroying them can be a big issue.

Welcome back to another “easy to use tip” from a concerned instructor/master tech. The smallest, and sometimes the least expected, issues cause techs the most trouble when assembling items on vehicles. Taking things apart is generally never an issue, but taking them apart without destroying them can be a big issue. For example, putting small fasteners back in more difficult or awkward places is a major issue.

This month’s tip pertains to the installation of cap screws/bolts into these type of places. There are plenty of tricks that several old school techs have developed that work well. I am going to take this opportunity to tell you about one I developed through my suffering and agony trying some awkward bolt installations.

Choose your fastener and socket of choice, and place the bolt in the socket.

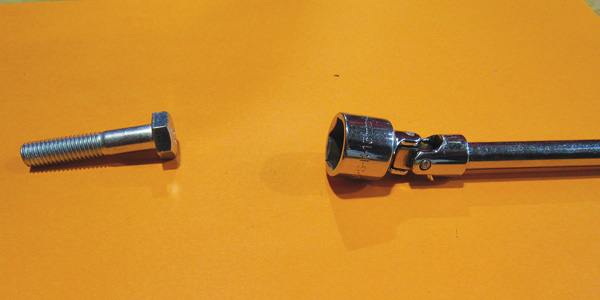
1. Awkward installs generally require the use of universal joints and/or universal sockets. Grab the fastener and your choice of socket.

Wrap Teflon pipe tape 1/4” from the edge of the socket and continue wrapping to seal. Continue wrapping toward the base of the bolt.

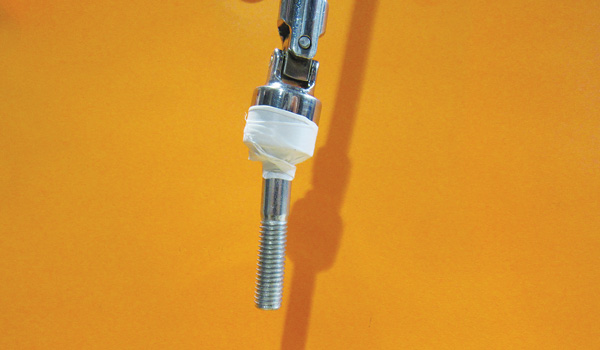
2. Place your bolt into the socket. Using Teflon pipe tape, wrap the pipe tape around the outside of the socket about 1/4” from the edge. Continue to wrap the tape a couple of times so the tape seals to itself. Then, continue wrapping the tape toward the base of the bolt head three or four times. The bolt will stay in the socket upside down, right side up, sideways, or any other direction you can think of.

The tape keeps the bolt in place during installation, and the tape will automatically stretch off.

3. Install your fastener applying the proper torque and the tape automatically will stretch off the fastener. You can also use Teflon tape for securing fasteners with Phillips, Posi-Drive, Torx or standard slotted heads. Hope you enjoyed this educational tip and are able to benefit from it.  

You May Also Like

PCV System DTC

PCV systems are far more complex now, but they are also much better at controlling crankcase pressure.

The PCV system helps to keep the pressure inside of the crankcase within a certain range. Blowby gasses are generated by the pistons moving up and down inside the cylinders. Automakers have come up with a number of solutions to control crankcase pressure. We’ve come a long way from the days of small, inexpensive PCV valves which were a regular maintenance item. Nowadays, PCV systems are far more complex, but they are also much better at controlling crankcase pressure.

Transmission Valve Body Replacement

Learning how to perform drivetrain diagnostics and “in-the-car” repairs is important.

Adjusting Parking Brakes

You should never estimate when it comes to parking brake adjustments.

Mercedes-Benz Alignment

Here are some tips and tricks that should help you to work on just about any Mercedes-Benz from the past few decades.

High-Pressure GDI Fuel Pumps

When solving a fuel pump issue, the scan tool is your best friend.

Other Posts

Diesel Turbocharging Basics

There’s a reason diesels typically utilize compound turbo setups instead of twin turbochargers.

Troubleshooting Tire Vibration With Proper Wheel Balancing

Around 60% of vibration-related comebacks are due to improper wheel mounting or balancing.

CV Axle Installation Tips

CV joint shafts are typically being replaced at anywhere from 70,000 to 130,000 miles.

Reflashing Power Supplies

Trying to make do with a battery charger or jumper pack can cost you more than the price of a reflash power supply. Â