 By Bob Dowie, import contributor
Mazda has long enjoyed a reputation as a performance car company with the RX8 and MX5, as well as has been able to consistently hit the target when it comes to affordable sport sedans that are as reliable as they are fun to drive.
In this article, we’ll take a look at the popular MAZDA6 and MAZDA3. We’ll cover some of the common underhood repairs that find their way into shop. We’ll also check out some of the new
technology that has been incorporated into Mazda engines.
Common Complaints
Let’s start with cars that have driveability problems. One thing that hasn’t changed in all the years I’ve been doing this are the basic complaints we hear. It’s either running rough at idle, missing or “skipping” under load, hesitating (at speed or throttle tip in) or there’s no power. It’s up to the service writer to ask the right questions when the appointment is made so the tech has the information needed to make a successful diagnosis and repair.
One of the most common failures we see on both early- and late-model Mazdas is a torn air intake hose between the airflow sensor and the throttle body. The symptoms that result from this failure are hard to miss. The usual complaint is a big stumble or stall on initial acceleration, but it may or may not set a system lean code. As the engine torques on the mounts, the crack in the hose will open, allowing unmetered air into the manifold while, at the same time, reducing airflow through the sensor. Of course, when the engine stumbles, the crack closes, allowing the engine to accelerate, starting the entire process all over. Many times, the customer will mistakenly think the transmission is the problem.
Although it’s simple to diagnose with a visual inspection, I’ve seen some good technicians tricked by this one. Be sure to inspect the hose closely for cracks that won’t be obvious but will become evident when the engine is loaded against the mounts.
A vacuum hose can be the cause of another problem that may have you shaking your head. On the popular MAZDA3, you may have a customer complaining about a siren-like or screeching noise coming from under the hood. The more attentive ones may mention that it changes with throttle position.
While your first thoughts will have you looking at the drive belts, the real culprit is a failed PCV hose located under the intake manifold. The hose will weaken and split, allowing air to be drawn through the hose and causing the noise. While the hose can be accessed with starter removal, some techs feel removing the intake manifold is an easier way to go. So, while the repair sounds simple, be careful when
writing the estimate.
While we’re talking about the MAZDA3, there have been some reports of an erratic stalling
problem that may or may not set a crank sensor code, but the sensor will check out fine. If the car has aftermarket drive belts installed with an alternate cut, suspect a buildup of static electricity that finds its way to the sensor. You may see sparks jumping to the sensor when the car is idling, but if you’re faced with an intermittent stall, keep it in mind.
No Zoom-Zoom
When it comes to no-power complaints, a couple of things should come to mind. As with any diagnosis, your first step should be to hook up your scanner and see what codes are stored. If a code is present, be sure to look at freeze-frame data to see what the conditions were when the code was set. Many times, you’ll have a system lean code as the only hint for the no-power issue, and this coincides with the things we’re thinking about for a low-power issue.
Leave the scanner hooked up for the initial road test so you can look into the system as the car is driven. Look at the temperature parameters to confirm that the coolant and air intake readings are correct and changing as expected.
On the road, look at the fuel trims and calculated load as your window into what the fuel system is being told to do and how well it’s reaching the goal. If all looks good on the intake side, the next step will have you checking exhaust back pressure.
I’m sure we all know what the trim numbers mean at this point; it’s an easy concept to grasp. If there is a minus sign in front of the number, the ECU is removing fuel; no minus sign means fuel is being added. In an ideal situation, the numbers are close to zero, since the only way the ECU knows what the engine needs to meet its fuel requirements will be the pre-cat air/fuel ratio sensor (formerly known as the O2 sensor), with some consideration given to rear O2 sensors.
If you’re faced with a car with a low-power complaint or a rough idle, take a look at the long-term trim. If you have a positive number in the 20s, think about the things that will make it run lean. If you also have a misfire code or a rough idle, don’t overlook the possibility of an intake gasket leak.
While it’s not a real common problem, we have seen some on the four-cylinder cars. If you’re looking at a multi-bank engine, make note if both banks are showing a similar number or if it’s just one bank. Freeze-frame data will also tell you when the limit was reached.
You can make some decisions once armed with this information. If the limit was reached at idle, it would have you looking for unmetered air finding its way into the engine. It could be the EGR valve, but it could also be an intake manifold gasket leak or the O-ring seals on the V6s.
On the four cylinders, a leaking intake gasket will usually set a misfire code, along with the system lean code. Usually all it takes is a shot of intake cleaner at the manifold flange and a stethoscope to confirm the diagnosis. The six-cylinder engine’s upper manifold O-ring leaks can be a bit more challenging and, if in doubt, a smoke test will confirm you’re on the right track.
We already talked about the PCV hoses failing, and this will undoubtedly cause a lean condition with or without the noise. Other not-so-obvious sources of vacuum leaks include a leaking EGR valve that’s more common on the older cars (but there are still plenty of them out there), and sticking purge valves on the later cars.
The EGR valve is an easy diagnosis; if exhaust gases are leaking through the valve, it will be noticeably warmer than the adjacent area. The purge valve can be a bit more difficult since the problem is more a sticky valve than it is a hard failure.
This is one of the times where you have to rely on what you know and make your best decision. If you have an evap code, along with a system lean with no obvious problem for either, it’s a safe bet that the purge valve is sticking. Any sign of charcoal contamination should have you recommending a new canister.
On the other hand, if the freeze-frame information is telling you that the code was set at speed, the idle is smooth and the driver reports no additional symptoms, think about what makes it lean under those conditions.
My first thought would be the mass air sensor; by now, we should all be aware of how debris finds its way to the hot-wire sensor. If you’re going on an initial road test after checking and clearing codes and memory, set the scanner up to monitor the fuel trims and calculated load. Before you hit the road, make sure the short-term trim is reacting as expected.
On the road, do a couple of wide-open accelerations making note of the calculated load — it should be a 90-plus percentage. If not, take a close look at the air sensor for contamination.
The sensors can be carefully cleaned, and we’re having good luck with some of the products designed for the job; but be gentle as they are fragile. We look at cleaning the sensor as part of the diagnostic process and recommend a new sensor to ensure a successful repair (note that on the invoice to prevent any misunderstandings).
Once the problem is diagnosed and repaired, make sure that the bolts holding the sensor to the air filter housing are tight, that the air filter box is not allowing unfiltered air into the sensor, and that the air filter element is of high quality and in good condition. There have also been reports of the sensor housing bolts coming loose, letting dirt into the air stream. Be sure all the air is being filtered.
Managing Misfires
As I mentioned earlier, misfires that are evident shouldn’t be a real challenge to diagnose. To protect the cat converter, misfires are monitored closely and it’s rare not to have the check engine lamp even blinking along with a solid misfire. Your first step should be to get the codes and other info the system is willing to share.
You would expect a misfire code directing you to the offending cylinder, but don’t overlook the other available information. An accompanying fuel-trim code, for example, is an important clue as to what could be causing the misfire and, if nothing else, it should have you looking for additional issues as the misfire is diagnosed.
Don’t forget to check the freeze-frame information for conditions when the code was set. This is especially true if the car is currently running well and the misfire is intermittent.
Before the initial road test, look at the live data to see if the temps are accurate, whether the throttle switch is changing, if the air mass sensor is reacting as expected (and look at the long-term trim to see if the computer is adding or removing fuel to maintain the correct mixture), and see if short-term trim is close to zero. You should keep these things in mind as the diagnosis moves forward.
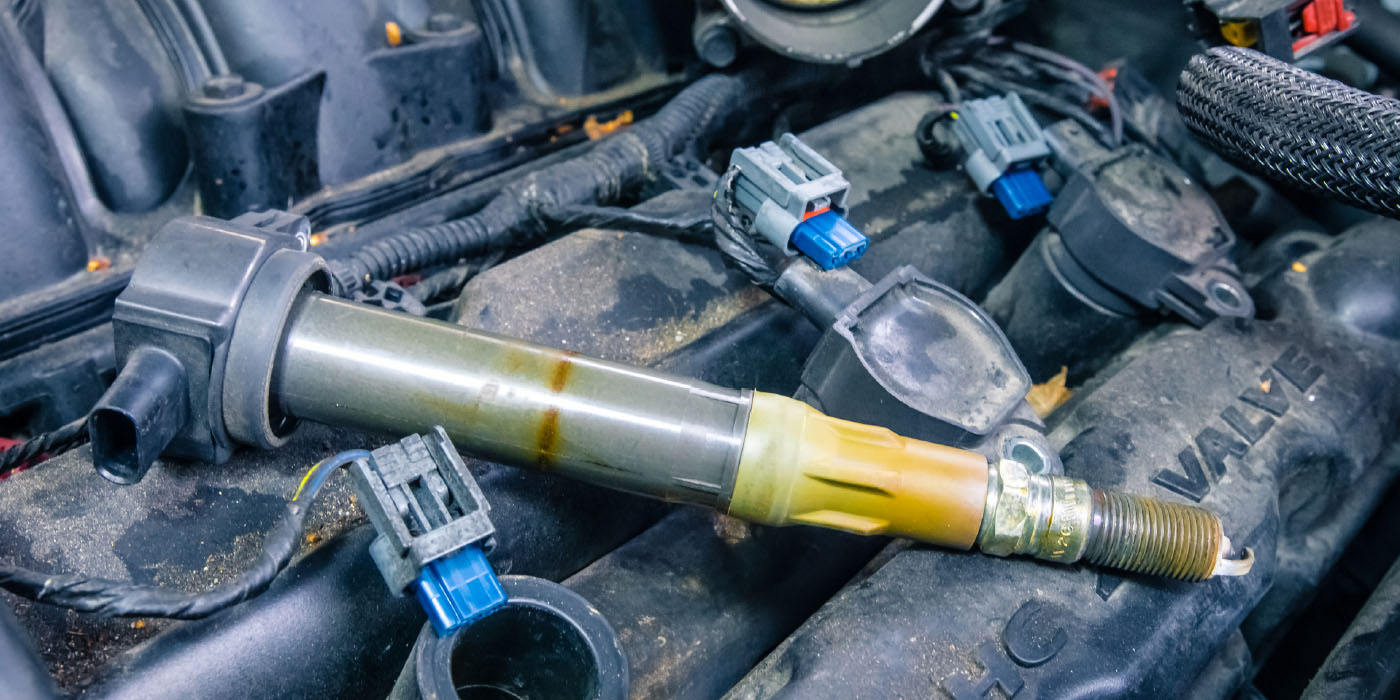
In recent years, Mazda has changed over to the coil-on-plug system to better control those catalytic converter-killing misfires. While I’m sure this system does a great job of dealing with misfires better than the old ignition wires, it is not without its problems. In many cases, the easiest way to confirm a coil problem is to switch it with an adjacent cylinder and confirm the misfire moves with the coil. Don’t forget to look at the condition of the spark plugs and it takes only a couple of minutes to test compression.
With extended service intervals, drivers tend to forget about routine maintenance. With that said, if the plugs are shot, chances are the car is in need of a service. Fix the misfire first, but don’t overlook the opportunity to recommend the rest of the service.
Our diagnostic and repair strategy changes a bit when you’re dealing with a six cylinder where it’s more labor intensive to access the coils. In the case of a solid misfire, before you dig into removing the manifold, listen to the injectors with a stethoscope to confirm they are working and sound similar.
Also double-check for any severe vacuum leaks. Of course, either of these problems would result in a high positive fuel trim number. If we suspect a coil failure, we always recommend that all coils in that bank be replaced along with the spark plugs.
I know we’re all familiar with diagnosing and repairing misfires and it’s just our nature to get into the job and fix it with an “I know how to do this” attitude. But, in this day and age, it’s more important than ever that you get into the service information and online forums to check for service bulletins and recalls.
You can spend a lot of time looking for that random miss at 1,500 to 2,000 rpm, only to find out that there was a reflash offered that took care of it. Make it one of the first steps, even if there are no bulletins, as I’m sure you’ll get some useful tips on the repair.
Pedal to the Metal
The latest technology from Mazda that’s finding its way to us is drive-by-wire throttle control. These systems are pretty much trouble free but have to be taken into consideration as we perform routine service and diagnose problems. It’s really a fairly simple system; a 12-volt motor opens the throttle as controlled by the PCM based on various inputs.
Along with the electronically controlled throttle body, an accelerator pedal assembly was added that mimics the feel of a mechanical throttle, yet houses the necessary accelerator pedal position sensors that tell the PCM what the driver is asking for. It’s easy to think that we replaced a simple cable-operated throttle with a complex electronic unit, but this has really simplified things, while providing engineers with even more options for vehicle performance, convenience and vehicle stability.
It changes the way we service these cars when it comes to cleaning the throttle plates. To prevent damage to the electronics, it’s important that we use very little solvent in the process. The best strategy is to apply the solvent to the shop rag or brush that’s being used in the cleaning process, with very little or no solvent being sprayed into the housing. If you have to use some solvent in the housing, avoid the shaft area where it could find its way into throttle actuator and position sensors.
One of the advantages of this system is its ability to open the throttle and maintain the target idle speed, even if the plate is dirty, eliminating the need for and the limitations of an idle speed control motor. That certainly doesn’t mean the plates should be ignored; it’s still important that they are cleaned to ensure smooth operation.
These systems have been very reliable. While there were some problems when the system was first introduced in 2003, most of those troublesome units were replaced under warranty, although we have recently seen one. The service bulletin is available in your service information, but the short description is if there is AA, AB or BA identifying designations on the throttle body, suspect a bad unit and replace it with a unit carrying a BB.
When it comes to diagnosing this system, a scanner with OEM capabilities will be a big help. As you would expect, there are codes related to every part of the system that has limp modes connected to ensure the safety of the vehicle. RPM may be limited to a predetermined point or the throttle body may be held to an idle speed until the codes are cleared.
Don’t be intimidated by all those wires on the throttle body. You have two wires that control the throttle motor, with the others dedicated to letting the PCM know what’s going on with redundant throttle position switches that are part of the throttle body assembly.
When looking at the position switches on the throttle body, be aware they work in opposite bias, using a 5-volt reference or input; switch one will read high voltage at idle (approx. 4.3V), while switch two will be low voltage (0.8V). Look for the opposite voltages as the plate moves toward wide-open throttle.
The PCM will make its decisions by looking at what the throttle is doing, along with the accelerator pedal position switches located in the pedal assembly; again these are redundant switches for reliability. These switches are different in construction being a non-contact Hall effect-type sensor rather than the mechanical sweep-type switch. They are tested in the same way by looking for smooth voltage output throughout the range of movement with no dropouts or spikes. 
Both pedal switches read low voltage at idle and increase as the pedal is depressed. Be sure to check the specs as its normal for switch one to read half a volt more than switch two. There have been no reports of problems with the pedal assembly with most of the failures leading to throttle body replacement.