Everybody loves dynamometers. Whether you’re building the engine, owning the car or just a fan of fast changing numbers, an engine dyno can provide satisfaction that the hours (and dollars) have been worth it.
However, experts say that far too often guys put all their focus on the engine dyno unit itself and not enough thought into the space their engine dyno will be housed in. The construction of the dyno room is very relevant to the performance of the dyno.
There are a number of things to consider when at this phase of the process. Many people may not think too far beyond the engine dyno unit itself, but trust us, that’s an enormous mistake. In fact, the dyno room can have more impact on the performance of your dyno than you may realize, so it’s imperative your room has the necessary elements the dyno and your engines will need during engine break-in, customer pulls and testing sessions.
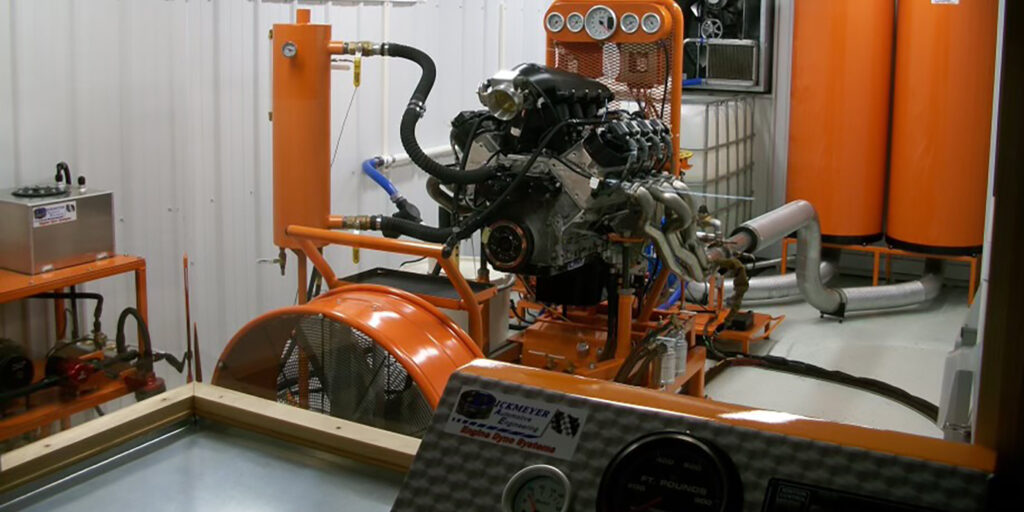
To understand what needs to be in the dyno room, we caught up with a long-time friend and one of the smartest engine builders we’ve had the pleasure to speak with, Matt Dickmeyer of Dickmeyer Automotive Engineering in South Whitley, IN. Over the past few years, Matt has been building out a dyno room and a dyno unit (DAE Dyno Systems) all his own creation. He recently finished the project and we sat down with him to pick his brain on the key elements that make the difference between a good dyno room and a great one.
Finding Space
First and foremost, you’ve got to consider what space you already have to work with or whether you need to build out a space to house your dyno.
“For us, we had one area, which was my catchall room. It had piles of engine blocks and stuff I couldn’t bring myself to throw away. Step one was realizing this room is going to be worth more as a dyno room than a storage room.”
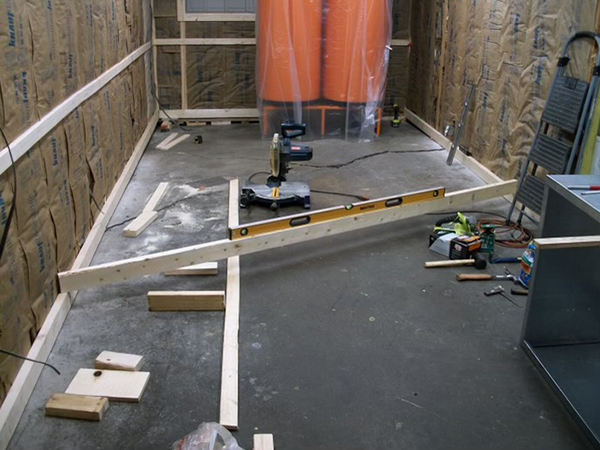
After clearing the space, Matt assessed the square feet of the floor and then the cubic feet of the room to make sure it would work and that he wouldn’t have to do a bunch of new construction.
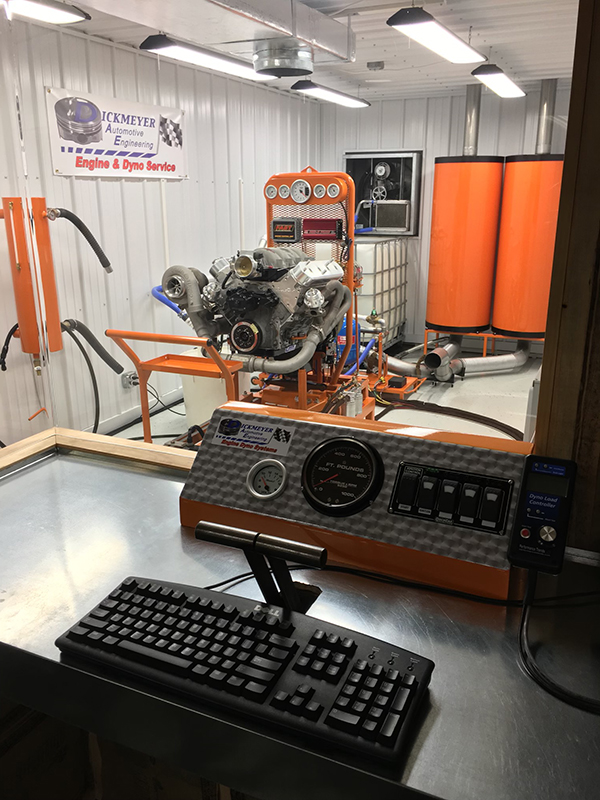
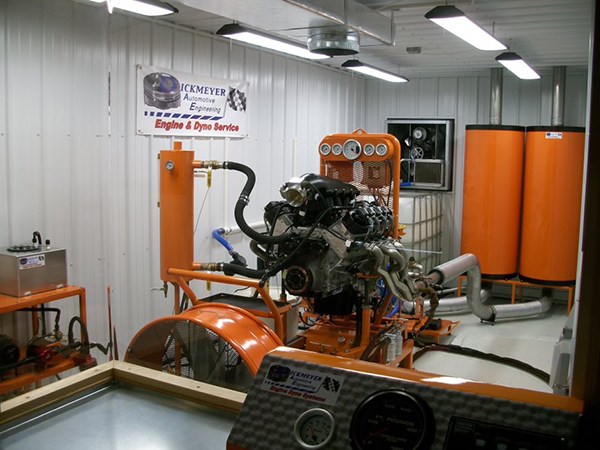
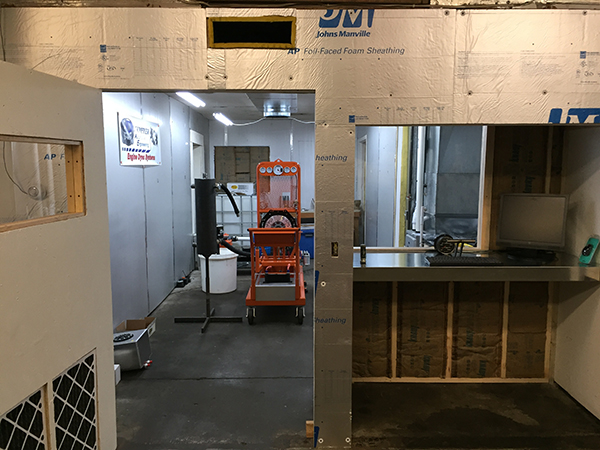
“For us, the space worked out really well,” he says. “Our dyno room is 9 feet wide, 8 feet tall and 22 feet long. It’s like a wind tunnel.”
With a space picked out, you want to ensure you’re able to put everything you need in that room in terms of work space, air flow components, water storage, and more.
“A lot of times, guys need humongous water storage – 1,500 or 2,500 gallons,” Dickmeyer says. “You’re not going to be able to put that in your room. You’re going to have to put it in another room, which encroaches into another usable space. My dyno room is between the engine room and our fabrication and welding room, so I really couldn’t put a great big storage tank in either place. In that respect, it made it necessary for me to reinvent the wheel a little bit. I had to design a new operating system for water so I wouldn’t have to have such a huge amount of water storage.”
We mention water storage because, at the end of the day, the water brake dyno is still the best way to apply load to an engine.
“A water brake, if run properly and the water is filtered correctly, can run for life,” Dickmeyer says. “You can hand it down to your kid. You’re never going to get an eddy current that you can do that with.”
Electrical & Safety
Once your physical room is defined, you’ll next want to think about the power going into the room. Most importantly, think beyond the power needs you might have and plan for it.
“I have three phase, single phase and 115-volt coming into my dyno room,” Dickmeyer says. “You really want to do that right before you do the room. If you think you’re never going to need three phase and you build your walls and you put in your insulation and your sheet metal, and then you realize you’re going to need it – you’re going to have to run your power externally. I anticipated everything when I ran electric into my room so it’s all in the studs and hidden, and it’s all there if I need it. Of course, I ended up needing it.”
While this might sound like common sense, when connecting your electrical to a breaker box, make sure you don’t place your box inside the dyno room. This is a safety hazard.
“Almost everybody I’ve talked to puts their breaker box in the dyno room,” he says. “You never want to do that because if you have an explosion or a fire, you can’t get in there to shut everything off. You’ve got this 10,000-cfm rocket booster supplying oxygen to the fire, and you can’t get in there to shut it off. All my breaker boxes are right there at the console to where if there would be a fire, I immediately can snap off the exhaust fan, so it shuts the air flow down to the room.
“I’ve also got a CO2 bottle bolted to the wall with a flex line running to two shower heads over where the carburetor would be. If there would be a backfire or something like that and it would catch something on fire, I have CO2 in the room to snuff all the oxygen out of the room and put the fire out.”
Matt warns to not overlook safety features like this. Don’t be in such a rush that you forget to do anything related to fire suppression. If you do, a fire extinguisher will put a fire out, but it will also destroy the engine you built.
“If you hit your engine with those powder fire extinguishers, even for two seconds, it’s going to look like a flower bomb went off in your room,” he says. “It will kill your engine. CO2 will not do that. The thing is, 99% of the time, you’re never going to have any problems, but that doesn’t mean you never will.”
Insulation & Noise
There are a few options when it comes to building your dyno room walls. However, most commonly, shops already have block walls within their shops, and this is a great foundation for a dyno room.
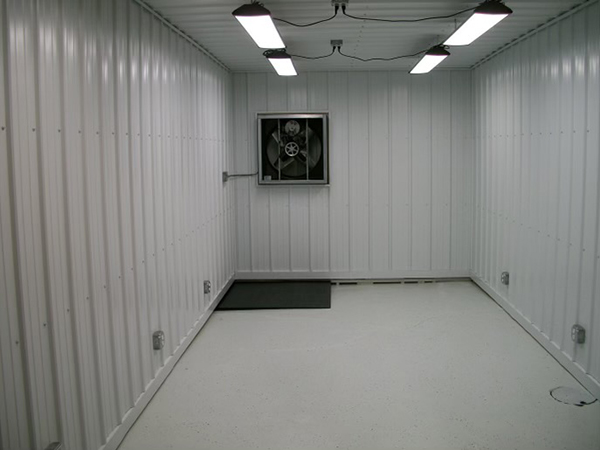
“In terms of insulation, we’ve got a block wall on the east and a block wall on the south,” Dickmeyer says. “I built a 2×4 stud wall up against the block wall. Then, I cut foam board into strips and jammed them between the 2x4s and put R15 insulation in the walls and R19 insulation in the ceiling.
“We’ve got a dedicated exhaust system that we built as well, and when we have an engine in here, the only thing you can hear in the alley is the sound of the fan. You can’t really hear much of an engine at all.”
Many engine shops are going to be in town or at least in city limits, so keeping noise to a minimum is important. To do this you’ll need to employ the use of a muffler of some sort.
“In my research, I found that there was really no manufacturers who build a dedicated dyno muffler,” he says. “When you buy a dyno, they just give you plans of what you could use. They suggest that you use semi mufflers or you can go with really expensive, big generator mufflers.”
For Matt’s set up, he wanted to be able to bring 4,500 horsepower down below 100 decibels.
“I did the math on it and we came up with the measurements and everything of the insulation, and for safe measure, I just doubled everything,” he says. “My mufflers are two feet in diameter. Each muffler has over 52,000 cubic inches of heat and sound dissipation – they work.”
Airflow & Exhaust
Pre-planning your room space, the electrical, insulation, and safety measures are all important, but proper airflow and exhaust are the real keys to the performance of your dyno.
“In building my dyno, I’ve talked to tons of guys and basically the two questions that every guy asks is how much water do I need and how much airflow do I need,” Dickmeyer says. “Those are the No. 1 and No. 2 most important aspects of your dyno room. The answer for airflow is you can’t have enough. Whatever you think is going to be good, you’re going to need more.”
The rule of thumb is eight to 10 times air exchange per minute. If you end up with 12x, 15x or even 20x air exchange, it’s not going to hurt anything by having too much.
“Ideally, you would like it to where if you threw a piece of tissue paper up in the air, it gets sucked out of the fan and never hits the ground,” he says.
To that end, make sure you don’t skimp on your fan selection. Oftentimes, engine builders choose a fan that would be great for a bathroom, but not good for a dyno. Performance engines put out more heat than you would think – even just idling – so your fan is crucial.
“When you do a break in for 20 minutes and you bring it down to idle, even with good airflow, your room could go up 10-20 degrees F or more,” he says. “The answer to airflow is you can’t have enough. With a lot of the guys I’ve talked to, the fan they need is expensive. Because another option is $400 cheaper, they revert to the fan that they don’t need. In trying to keep the price down and be cheap, guys actually cost themselves more than if they would have just bought what they needed in the first place. Some people focus too much on cost and not what they actually need.”
In Matt’s case, a 36˝ fan would have been ideal. However, he only had enough room to put a 24˝ fan in his room.
“I worked with a company called Triangle Engineering and they were able to put really aggressive pitches on the fan blades, so my 24˝ fan moves the air of a 30˝,” he says. “For your exhaust fans, if you’re doing a square-type exhaust fan with shutters on it, you’ve got two options. You can have a direct drive where the fan blade is on the shaft of an electric motor, or you have a transmission type where you run different pullies and a belt. I went with a transmission type.”
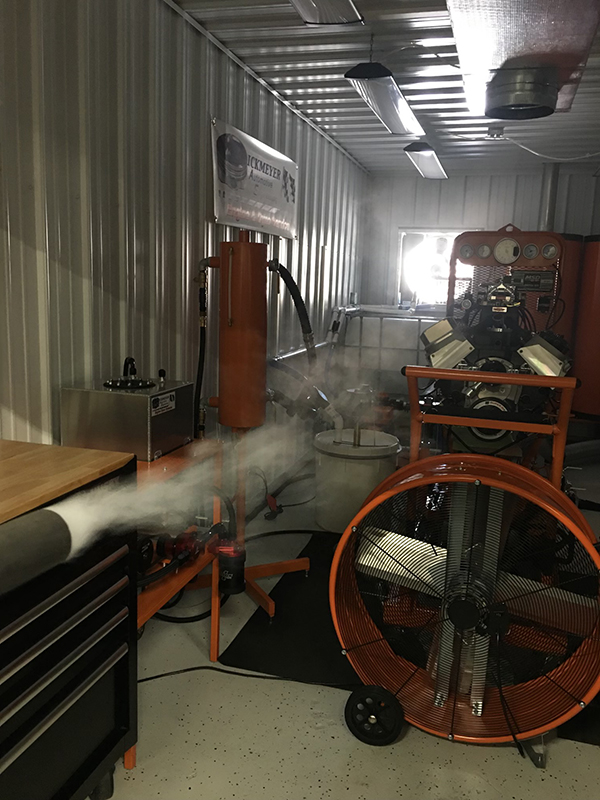
You can actually quantify your dyno room’s airflow by the increase in resistance to open the dyno room door. To test the airflow, Matt used a smoke machine, similar to a wind tunnel, and pulled the smoke through the dyno room to ensure he had good flow.
“I saw there was buffeting going on by where my computer and instrumentation was and the air was swirling around, but not really leaving the room,” he says. “To remedy that, I bought a big barn fan and I put it right in front of the engine, so it blows over the engine and then over the headers. That set up gave me really good cross flow.”
Having good airflow is a two-part deal – airflow and exhaust. Again, the rule of thumb is 10 exchanges per minute. If you’ve got a 1,500 sq.-ft. room, you’re going to need 15,000 cfm of airflow.
“If you stand in your dyno room, you shouldn’t be able to smell exhaust,” he says. “If you can, you don’t have enough airflow or you don’t have a good enough seal to your exhaust system.”
Water Supply
Second only to airflow and exhaust is your dyno’s water supply. As mentioned earlier, depending on your dyno, you could need thousands of gallons of water storage and a good way to supply it to your engine, assuming you’re using a water brake dyno, of course.
Water is how a water brake dyno works, so if you don’t have the right amount of water, both in pressure and volume, you’re going to be chasing your tail. Despite all the years the water brake absorber has been in use, manufacturer’s water supply figures are sort of all over the place.
“The general consensus is too much is just enough,” Dickmeyer says. “In some respects, it’s smart to go with big pumps because what typically happens is you start out with a dyno you can afford. It’s not really the one you need, but it’s what you can afford. It’s not very long before you’ve outgrown that dyno and you get a bigger one.
“The dumb thing to do would be having to change pumps every couple of years. Getting a one-pump-fits-all is a good idea. A lot of your manufacturers say you’re going to need 10 gallons per minute per 100 horsepower. On our system, I’ve got it dialed down to between 5-6 gallons per minute per 100 horsepower.”
According to Matt, there’s no exact water supply number because various engines will come into their power differently. For instance, a 632 big block Chevy is going to come into its power much differently than a 347 small block Ford, thus requiring varying water supplies.
“Even a 1,000-horsepower big block and a 1,000-horsepower small block, despite generating the same power, each has a slightly different water consumption and requirement because of the aggressiveness in which the power comes in,” he says. “Our set up is kind of different. I actually set it up to where I have a bypass regulator on it like what you would do with a fuel injection system.
“What I see a lot of guys do is they’ll run this great big pump, and then they’ll put a water reducing regulator on it, between the pump and the absorber. You run your pressure into the rails, out of the rail, into a regulator, and then out of the regulator, back to the tank. That’s how I did my system and it works great.
“Instead of regulating the pressure or the amount of water that gets to the absorber, I’m regulating the return flow – what goes back to the tank. What that does is if you have an engine that comes into power really quick and really hard, you have more water at the ready because you’re bypassing what you don’t need. If you need more water, that amount of bypass reduces down.
“If you run your reducing valve between your pump and the absorber, you can never get any more water than what’s going to it. If you’ve got an engine that comes into the torque really fast and hard, you can’t get any more water and the engine will literally run away from you on the dyno. If you’re not ready for it, an engine can go from 4,000 to 9,000 rpm in about 0.2 seconds if you run out of water. Your ass can’t even pucker up and take a chunk out of the seat in that time. That’s when you throw rods through the block.”
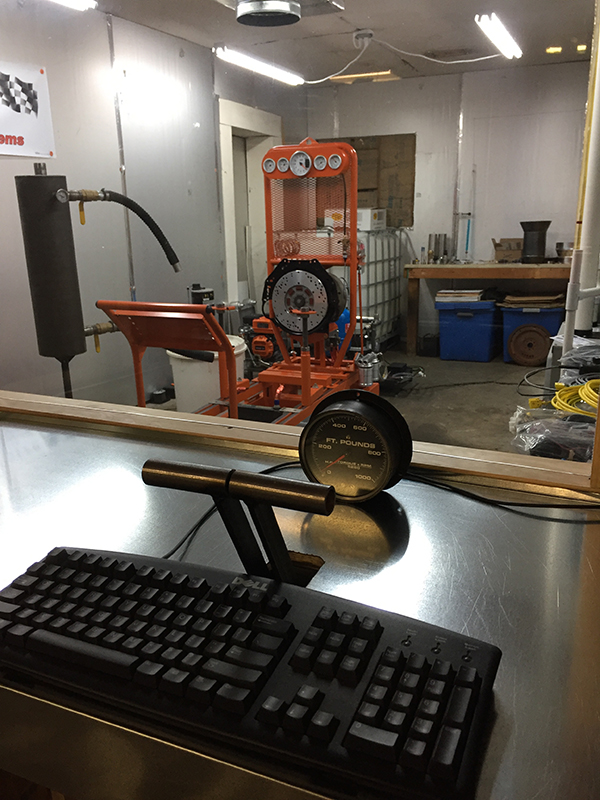
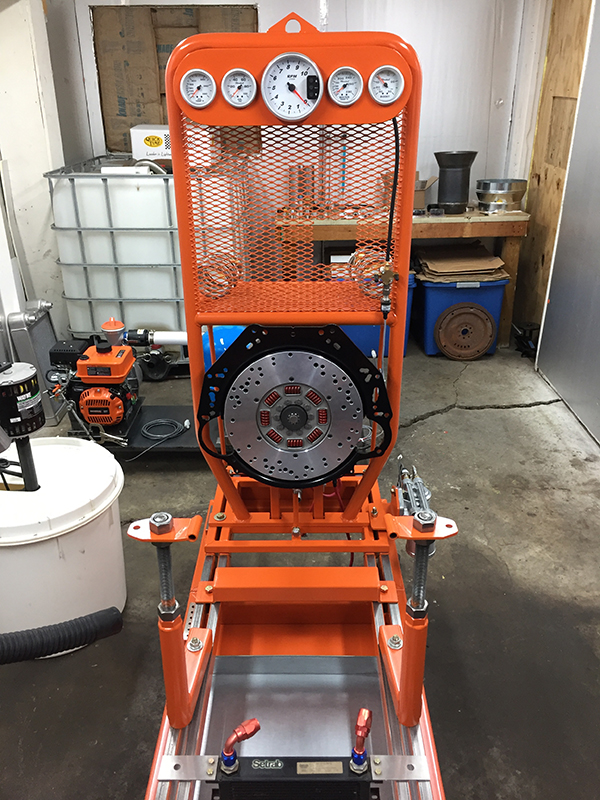
When it comes to Matt’s absorber, he’s using a Go Power DA-516. In addition, most dyno set ups will require a pancake load cell or an S-type load cell. Matt is relying on older technology – hydraulic load cylinders and a manifold, so when the absorber rotates, it pushes the fluid in the cylinders like a hydraulic ram would. He then has a 1,500-psi transducer and the instrumentation converts psi to horsepower. Matt’s dyno is rated to 1,500 horsepower.
Final Set Up
Of course, there are a number of little things that make up the remaining elements of a dyno room and the dyno unit itself, but we focused on the key ingredients to a successful dyno room. Just remember, when doing your final set up, don’t forget to make your dyno handy for your use and ensure you have work space available in the room too.
“You also don’t want to be tripping over a bunch of stuff, so make sure you think out those logistics,” Dickmeyer says. “If you’ve got everything so jammed in there that it’s just not comfortable to work in, that’s going to be a pain. You also want plenty of workspace for a toolbox, cabinets and counter space.
“You’re going to need a lot more workspace than you think, because the dyno room often becomes a secondary engine room. You’re going to get overflow from the engine room that goes into the dyno room and you don’t want to have to be walking back and forth. Put enough space in there that you can comfortably put parts and tools down.”
When it comes to a dyno room, some guys don’t care what it looks like as long as it works. Sure, that’s acceptable, but a dyno is something you should showcase. You want it presentable, because at the end of the day, it’s this kind of equipment that sets you apart from other shops.
This article appears courtesy of Engine Builder.