The Trick To Tricky Cap Screw/Bolt Installations -

The Trick To Tricky Cap Screw/Bolt Installations

Taking things apart is generally never an issue, but taking them apart without destroying them can be a big issue.

Welcome back to another “easy to use tip” from a concerned instructor/master tech. The smallest, and sometimes the least expected, issues cause techs the most trouble when assembling items on vehicles. Taking things apart is generally never an issue, but taking them apart without destroying them can be a big issue. For example, putting small fasteners back in more difficult or awkward places is a major issue.

This month’s tip pertains to the installation of cap screws/bolts into these type of places. There are plenty of tricks that several old school techs have developed that work well. I am going to take this opportunity to tell you about one I developed through my suffering and agony trying some awkward bolt installations.

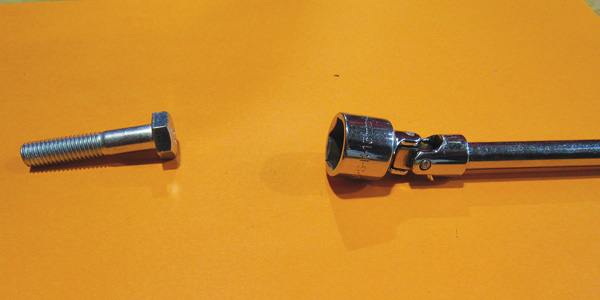
Choose your fastener and socket of choice, and place the bolt in the socket.

1. Awkward installs generally require the use of universal joints and/or universal sockets. Grab the fastener and your choice of socket.

Wrap Teflon pipe tape 1/4” from the edge of the socket and continue wrapping to seal. Continue wrapping toward the base of the bolt.

2. Place your bolt into the socket. Using Teflon pipe tape, wrap the pipe tape around the outside of the socket about 1/4” from the edge. Continue to wrap the tape a couple of times so the tape seals to itself. Then, continue wrapping the tape toward the base of the bolt head three or four times. The bolt will stay in the socket upside down, right side up, sideways, or any other direction you can think of.
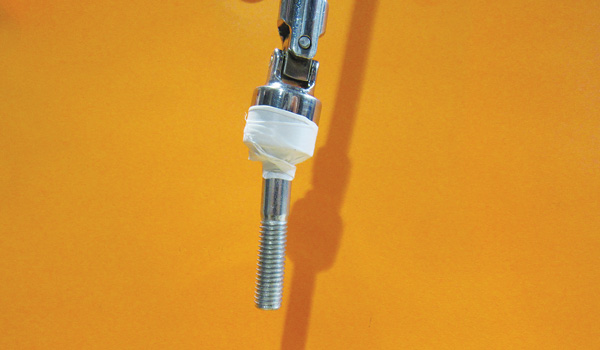
The tape keeps the bolt in place during installation, and the tape will automatically stretch off.

3. Install your fastener applying the proper torque and the tape automatically will stretch off the fastener. You can also use Teflon tape for securing fasteners with Phillips, Posi-Drive, Torx or standard slotted heads. Hope you enjoyed this educational tip and are able to benefit from it.  

You May Also Like

ADAS Calibration Aborts

Troubleshooting the problem comes down to knowing the failure, vehicle or fixtures.

If you have invested in the fixtures and scan tools to perform ADAS calibrations, you know most systems will walk you through the entire process. But, what happens when you follow the directions and the process still won’t initialize or complete or a malfunction light comes on?

Understanding Differences Between Aluminum And Cast Iron

Sheer material differences aside, what are the features and benefits of aluminum and iron engine components?

Ford 3.5L EcoBoost Turbocharger Oil Leaks

Ford has revised the service information for the inspection and pinpoint tests of the turbocharger and oil lines.

ADAS False Activation Evolution

Since 2006, advanced driver assistance systems (ADAS) have evolved from active cruise control to autonomous driving controls.

Crankshaft Counterweights And Balancing

Imbalance in the engine exhibits vibration and damage. Balancing becomes critical to any engine build.

Other Posts

Diagnosing Misfires

What if there are no codes and a misfire is intermittent? This is where it gets complicated. 

The Importance Of ADAS Calibrations

Following best practices and using appropriate equipment ensure customer satisfaction and safety.

Fuel Pressure Diagnostic Service

Use a scan tool that can look at special direct fuel injection parameters and perform bidirectional tests.

Why Do Vehicles Go Out Of Alignment?

If camber, caster or toe are out of specifications, there is usually a reason why.