Subaru has packed a lot of drivetrain and accessory pieces into a compact area, but the layout is such that with a little planning, most drivetrain and suspension repairs are easily completed.
In fact, as you enter into the auto repair industry, youll find Subaru vehicles are a very technician-friendly nameplate, with many different models sharing the same basic design and components. The parts that separate Subaru out of the ordinary are also the reason theyre so versatile. The Subaru Boxer engine design provides many advantages, including added ground clearance and a compact drivetrain, leaving room for people and payload. The layout of the drivetrain, with its longitudinal, rather than transverse, engine mounting, and straight-through transaxle allows for the addition of all-wheel-drive without major body differences or cumbersome transfer gears.
The Legacy series (including Impreza, Outback and Forester) from the early 1990s-on are the most common models we see and, except for some improvements, repairs are pretty much the same on all of them, up to the current models. This article will focus on some of the more common repairs we do and a few tips to make them easier.
Steering Pump
I havent seen a Subaru without power steering in years, but its no surprise that we do have to change a power steering pump or rack-and-pinion once in a while. Subaru has made the pump on these cars one of the easiest to replace of any car. Unfortunately for us, they dont fail. Usually the only problem is a leak between the reservoir and pump body. While the seal is easy enough to replace, weve had some recurring failures because the seal is difficult to seat. Just use care, and a little silicone paste, to make assembly easier.
In some cases, pump replacement is necessary after years of running low on fluid and noise complaints. The replacement procedure is typical, as stated in the repair manuals: Loosen the drive belt, remove any hose and mounting bolts as needed, and reverse to reinstall. This is one repair where the instructions are pretty accurate. The one item I would add is to use a flush machine, vacuum bleeder or other equipment to suck as much fluid out of the reservoir as possible to reduce the mess and keep fluid off of the other belts.
Replacing the Rack
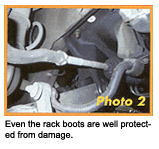
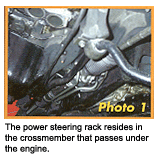 On the other end of the steering hose is the steering rack. Its tucked into a crossmember that runs under the engine pan (see Photo 1). It is well protected from damage by that crossmember, as well as the exhaust. Even the rack end boots are pretty well out of harms way (see Photo 2). Rack replacement can be easily facilitated by first removing a couple of other items.
Make sure the steering wheel is centered; lock in place, if possible.
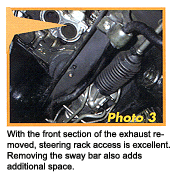
Remove the front exhaust pipes (see Photo 3). Remember to disconnect the front O2 sensor, and then separate it at the catalytic converter and remove the nuts at the headpipes to the cylinder heads. Removing the exhaust as a single piece saves broken-off bolts and additional time.
Measuring the toe at this point will make alignment easier after the new rack is installed. Disconnect the tie rods at the steering knuckles. Another way to retain steering angles and toe is to pull back the rack boots and disconnect the tie rods at the inner end. Leave them attached at the knuckles, that way the toe shouldnt change significantly.
Make a reference mark on the steering shaft so that you have a position for the centered steering wheel. Loosen the pinch bolt for the steering shaft to pinion shaft joint.
Disconnect and drain the lines from the pump.
On some models, removing the sway bar bracket retainers and swinging the sway bar out of the way may be necessary (removing the sway bar completely is easy as well). Then remove the mounting bolts for the rack and remove it.
Depending on whether youve got a long or short rack for replacement, transfer necessary items from the old to new and reverse the procedure to reinstall. If you are installing a long rack, remember to measure from tie rod end to tie rod end for basic measurement. With a short rack, just transfer the entire tie rod assembly, leaving the adjustment as is. Note: Always use new lock tabs here.
Inspect the mounting bushings for cracking or oil damage, and replace as needed.
After reconnecting everything, refill the system with the proper fluid and bleed. Recheck all fasteners and then reset toe to specs. Make sure the steering wheel is still centered and road-test.
Axles and Joints
As with all front-wheel-drive cars, the axles will need service, repair or replacement from time to time. Subaru has used the same basic axle design on all of these cars for the entire model run. They are fairly short, of equal length and are durable.
Considering the typical use of these cars for recreation, the number of axle problems are not excessive. The inner boot on the passenger side is the most susceptible to damage, mostly due to its proximity to the exhaust. Inner boot replacement on the left (drivers) side can be accomplished without axle removal. If the boot is damaged and there is no noise coming from the axle, only the boot needs replaced.
Rear axle or boot replacement is very unusual, mostly only due to damage or off-road use.
Front Axle Replacement Tips
Note: In this case, were using the right side as an example because its the most difficult. This can be done on the floor, with the car properly jacked and secured with jack stands, but is much easier on a hoist.
Remove the wheel and tire assembly. Remove the axle center nut. Spray the splines with penetrant fluid.
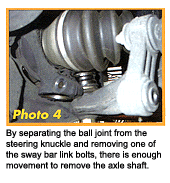
Remove the pinch bolt from the steering knuckle, spray the ball joint body with penetrant and pry the ball joint body out of the knuckle (see Photo 4). This can be an easier task if you remove one of the bolts from the sway bar link to allow additional lower control arm movement.
Turn the steering knuckle to the full right position to move the steering arm out as far as possible. Push, tap or rattle the axle out of the hub while applying outward pressure to the knuckle. This can all be done with the brakes in place if caution is used. The flex line for the brakes is just long enough to allow for removal of the axle from the hub. Also use care with the wiring harness for ABS-equipped cars. In really tough cases, you may need to press the axle out with a hub fixture and push bolt.
Remove the roll pin at the transaxle. This can be a challenge on the right front. From underneath, there is a hole between the crossmember, exhaust and O2 sensor that works well for aligning and removing the roll pin. I use a correct size (7/32) roll pin punch and a socket extension to remove the pin. The last tap will send the pin into some unknown black hole, so be ready.
The axle can now be removed from the splines at the transaxle, and removed to the outside. Compare the length, spline count and shaft size to the replacement and reverse the procedure to reinstall.
Due to the restricted space on the right front, use care with the new axle to prevent damage to the boots when installing. Note: Always use new roll pins here for safety reasons.
Line up the roll pin holes in the inner joint and transaxle output shaft and slide into place. Normally one of the holes in the inner joint will have a countersink, which will make starting the roll pin easier.
After a light tap to start the pin, tap the pin through, noting that the pin must stay aligned and also pass through the output shaft. Install until the pin is just flush with the joint housing on the other side. Use your judgment that the pin fits tightly enough to stay put. If the pin went in too easily, now is the time to replace it. Note that some new pins supplied by axle vendors can be oversized enough to make them very difficult to install.
New Boots
CV boot replacement is fairly simple if joint damage is not suspected. To replace the outer boot, the inner joint and boot must be removed as the outer joint usually isnt easy to separate from the axle shaft. The outer shaft or joint may be damaged if disassembly is attempted. As noted above, if the inner left side boot is torn, it can be replaced while on the car, just by separating the knuckle at the ball joint as noted, then pulling the axle off of the transaxle output splines.
The inner tripod joint can be removed by removing or pulling back the boot at the joint and then removing the inner circlip that acts as a stop to prevent the joint from separating. With the clip removed, the tripod trunion and bearings (free rings) can be removed from the housing. Its best to keep the tripod bearings on their respective pins and the bearings in the same races in the housing, so marking everything as you disassemble is important for joint life after reassembly. With the bearing assembly out of the housing, remove the external circlip that holds the tripod axle in place on the splined shaft and slide the tripod off. Marking position is again important to prevent vibration problems.
Now the inner boot, then the outer boot can be removed and replaced. Be sure to look for dirt or water in the joints, and repack with enough CV grease to provide lubrication, but not so much that there isnt any expansion space inside the boot. This may cause excess grease to be pushed out or the boot to dislodge. Reinstall the boot retaining bands with a proper crimping tool. Work the joints in all directions before reinstalling the axle, just to make sure there is no hint of binding. The joints should feel tight, but with no hitches, which could cause noise or vibration.
Checking out the Rear
The rear drive and suspension systems are very simple. One job we do fairly often is rear wheel bearing replacement. This is a typical type of pressed-in duplex bearing that can be removed with an on-car bearing press tool. To remove the axle for access to the bearing, remove the long front-to-back bolt that positions the outer end of the lower control rods. This will allow enough movement to angle the axle up or down to provide room for the press tool. The rest of the process is just like most front-wheel-drive cars with this type of bearing.
Note: Before going any further, always look at the location of the ABS components, in particular the wheel speed sensor. Sometimes its in the housing and reads off of the outer CV joint housing. On some models, the sensor is in the backing plate and reads a tone wheel on the wheel hub. In either case, be careful not to damage the sensor or tone wheel.
Rear Wheel Bearing R & R
Use a slide hammer to remove the wheel hub. Inspect the hub for any evidence that it was spinning in the bearing, and just test-fit it into the new bearing to be sure it will be an interference fit. If it just drops into the new bearing, replace the hub or get the correct new bearing.
Remove the two inner seals (one is a dust seal; the other keeps grease in the bearing).
Remove the outer seal if it didnt stay with the hub when it was removed.
Remove the circlip from the bearing housing. Spray around the outer edge of the bearing to ease the pulling process.
Use a bearing press set to pull the bearing out of the housing from the outside. Be sure to use a small diameter adapter on the inside that will fit through the housing.
Clean the inside of the housing and lubricate the bearing recess. Use the bearing press to push the new bearing in from the outside by using a larger diameter inner adapter or, if space is available, pull the bearing in from the inside. Reinstall the bearing retainer circlip into the housing.
If the outer bearing race stayed with the hub, press or rattle it off of the hub before you press the hub into the new bearing. Also, if you are replacing the hub and it didnt come with the tone wheel for ABS, be sure to transfer it from the old hub before
Reinstall the axle, torque the retaining nut to specs and stake in place. Road-test the vehicle and make sure the ABS light stays off.
Servicing Single and Double Cardan Universal Joints
Since we are on the subject of undercar repairs, the following is some general information on servicing or replacing universal joints for most four-wheel-drive vehicles (4WD) and sport utility vehicles (SUVs).
First of all, always follow the detailed procedure found on your shops information system or in the service manual. If you havent done one of these replacements before, have someone to help you with the first one.
The first thing to do after the vehicle has been hoisted and the driveshaft has been removed is to mark the yokes for correct phasing. (Phasing is the proper alignment of the inborn yokes.) If you are working with a split shaft, make sure to mark the shaft prior to splitting the shaft. When securing a shaft in a vise, make sure to clamp around the yoke and not on the hollow tube itself. This eliminates the chance of the hollow tube being damaged if clamped too hard. The best way to remove an old universal joint is to use the proper tools. After you have installed the new universal joint, make sure it moves freely in all directions.
Diagnosing a double universal joint problem is a little more difficult. This type of joint has many more parts. You will need to check these parts for proper wear: Propeller shaft yoke; thrust washers; socket needle bearings; socket ball; link yoke and other related parts.