How Motor Oil Helps Keep Engines Running Clean
As anyone who has even a small amount of experience working on engines knows, regular oil changes are one of the most important things that can be done to extend the life of an engine. Premium quality motor oil will maintain its effectiveness over the life of the oil drain, allowing it to help in keeping the engine clean.
Additive packages are added to motor oil and play a key role in helping to keep an engine clean and protected from varnish and sludge, as well as wear from heat and acids. Additives can consist of anti-wear agents, friction modifiers, dispersants, detergents, viscosity index improvers and antioxidants. Some key cleaning ingredients that make up motor oil additive packages are detailed below:
Anti-wear additives lay down a protective, sacrificial film between moving parts and also help stop oxidation of the motor oil.
Dispersants grab dirt and sludge before they can build up during engine operation, holding them in suspension and preventing them from depositing on to engine parts.
Detergents help keep high-temperature surfaces such as pistons clean. Changing the motor oil at proper intervals will help to prevent ring sticking and piston deposits.
Viscosity index improvers are chemical additives that are added to motor oil to ensure proper oil viscosity at extreme cold and hot operating conditions, enabling the development of multi-grade oils such as SAE 5W-20.
Friction modifiers help to reduce friction in critical areas of the engine, thus enhancing the vehicle’s fuel economy.
Anti-oxidants stop oil oxidation to help keep the oil from becoming too thick.
Properly functioning engine oils help enhance fuel economy, prevent sludge and varnish deposits and maintain proper low-temperature pumpability. The additives in engine oils are consumed during use at different rates, which vary with vehicle, engine type and driving conditions; therefore, it is not possible to establish a universal oil drain interval. Always follow the recommended oil drain interval and oil specifications found in the owner’s manual.
Provided by Pennzoil
————————————-
A Super-Duty Was a Super Headache
By Eric Seifert, ALLDATA Automotive Technical Editor
One of our technicians was having trouble replacing the spark plugs on a 2005 Ford F-250 Super Duty. Even though he followed the updated service procedure, a couple of the plugs separated upon removal.
Some 2004-2005 F-150 and 2005 F-Super Duty, Expedition and Navigator vehicles with a 5.4L 3-valve engine may experience difficulty with spark plug removal which may cause damage to the spark plug and leave part of the spark plug in the cylinder head.
AeroKroil spray lubricant, Motorcraft XL-2 Anti-Seize, Rotunda® Special Service Tool 303-1203 and a vacuum cap(s) will be required to complete the procedure.
Applicable Vehicles: 2004-‘05 F-150; 2005 Expedition, F-Super Duty and 2005 Navigator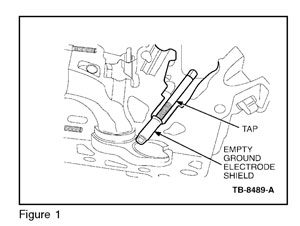
Repair Procedure:
Review Spark Plug removal along with safety procedures in ALLDATA Repair Manual before beginning.
If the plug does come apart, it will break in one of two modes:
Mode 1: The ground electrode shield is left behind as an empty shell (see Figure 1).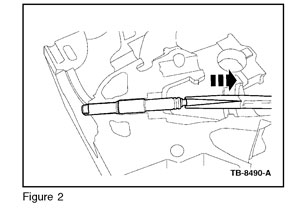
Mode 2: The porcelain center and ground electrode shield is left behind and only the upper jamb nut comes out.
In this case soaking with AeroKroil is required and long-reach nose pliers should be used to grasp and remove the porcelain center from the ground electrode shield (see Figure 2).
Once there is only an empty ground electrode shield left in the cylinder head, perform the following steps to remove the shield using Rotunda Special Service Tool 303-1203 (see Figure 3.)
NOTE: This tool is only designed to work with an empty ground electrode shield. If the spark plug came apart in Mode 2, the porcelain center must be removed prior to following these steps.
1. The combustion chamber must be protected from contamination during the extraction process by using a modified vacuum cap as a stopper-type plug. This is because the remaining ground electrode shield will be thread-tapped, so the cap is needed to prevent thread chips from falling into the cylinder bore. Cut a vacuum cap to a 3/8" (10 mm) length for each ground electrode shield that needs to be removed.
2. Install the modified cap with a long drill bit or suitable wire, sized for the internal diameter of the cap. The rubber cap should bottom-out on the electrode strap of the ground electrode shield once installed.
3. Thread-tap the ground electrode shield using a 9.0 x 1.0 mm "plug" tap.
a. Coat the end of the tap with general purpose grease.
b. Turn the tap about 3 to 4 turns into the ground electrode shield once the tap begins to cut. As the shield is tapped, for every 1/2 turn, the tap should be backed up 1/8 turn to "break chips" and prevent any cut material from coiling-up and laying in the spark plug well. All of the thread chips will embed in the grease pack or drop inside the vacuum cap when following this procedure. A suitably sized tap wrench of about 7-9 inches in handle length will aid in reaching down the well. If not available, use an 8-point socket with a ratchet and drive extension. Keep the shank aligned with the axis of the spark plug bore cavity to prevent possible thread bore damage. Use care not to damage any spark plug threads on the way in.
CAUTION: Do not attempt to remove the ground electrode shield with the tap and wrench. The tap may break if this is attempted.
c. Carefully back out the tap while maintaining the residual grease coat on the tap which contains some chips. Take care not to touch the sides of the spark plug well bore during removal.
4. Once the ground electrode shield is tapped, thread Rotunda Special Service Tool 303-1203 into the ground electrode shield to extract it from the spark plug well and encapsulate any remaining chips from falling into the combustion chamber (see Figure 4).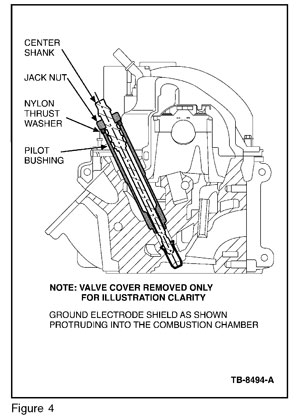
a. Install the stepped end of the tool pilot bushing into the spark plug well ensuring it bottoms out.
b. Screw the center shank into the ground electrode shield. Do not over tighten the shank, to prevent thread stripping.
c. Install the nylon washer and jack nut until finger tight.
d. Turn the jack nut with a socket and 3/8” drive ratchet until the ground electrode is freed from the cavity and withdraw the tool assembly. Several turns of the nut are required. Upon removal, any remaining chips not caught earlier by the tap grease will be captured by the rubber plug sitting at the bottom of the ground electrode shield.
NOTE: Once the spark plugs have all been removed, new plugs should be installed using a film coating of Motorcraft anti-seize lubricant (XL-2) on the ground electrode shield. Do not coat the electrode strap or the plug will misfire. New plugs should be installed with no lubricant on the threads and torqued to specification, 25 lb-ft (34 n.m).