 Deciphering a Clicking Noise During Braking
If a 2009-’10 Honda Pilot owner complains that the vehicle is making one or more clicking noises from the front suspension while accelerating or braking, it could be due to a faulty front suspension rear lower arm bushing bracket.
If this is the case, replace both front suspension rear lower arm bushing brackets, and check the wheel alignment.
Parts & Tool Information:
Lower Arm Bushing Bracket Set
P/N 04513-SZA-000
Ball Joint Castle Nut (2)
P/N 90365-STX-A00
Lower Arm Flange Bolt, 14 mm (4)
P/N 90118-STX-A00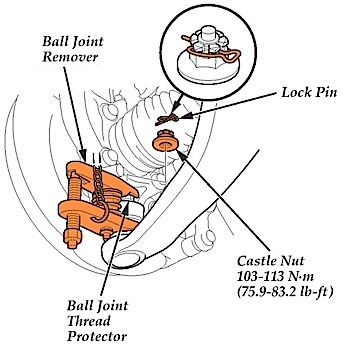
Lower Arm Flange Bolt, 16 mm (2)
P/N 90118-SJC-A00
Ball Joint Remover, 32 mm
T/N 07MAC-SLOA102
Ball Joint Thread Protector, 14 mm
T/N 071AF-S3VA000
Diagnosis:
Listen for one or more clicking noise from the front suspension while accelerating from a
moderate stop (between normal and abrupt), or while braking.
– If you hear the noise, go to the Repair Procedure.
– If you don’t hear the noise, continue with normal troubleshooting.
Repair Procedure:
1. Raise the vehicle on a lift.
2. Remove the front wheels.
3. Remove the lock pin from the lower arm ball joint, then remove the castle nut. 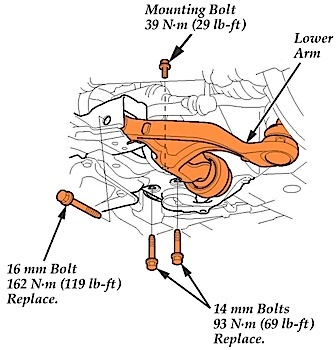
See Figure 1.
4. Disconnect the lower arm ball joint from the knuckle using the ball joint thread protector and the ball joint remover.
Note: Be careful not to damage the ball joint boot when installing the remover. Do not force or hammer on the lower arm, or pry between the lower arm and the knuckle. You could damage the ball joint.
5. Remove the mounting bolt from the rear side of the stabilizer bar bushing holder.
6. Remove the 14 mm and 16 mm lower arm mounting bolts, then remove the lower arm.
See Figure 2.
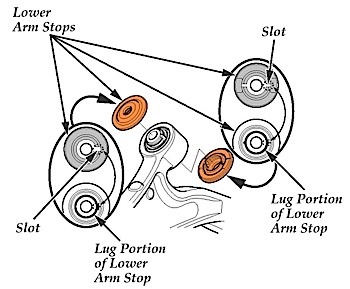
7. Remove the lower arm stops.
See Figure 3.
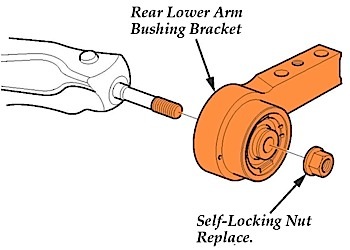
8. Remove the self-locking nut from the rear lower arm bushing, then remove the rear lower arm bushing bracket.
See Figure 4.
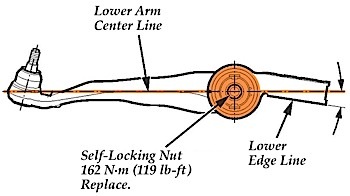
9. Install a new bushing bracket on the lower arm, and then align the angle of the lower arm
center line and the lower edge line of the bushing bracket as shown in Figure 5.
10. Install a new self-locking nut, and then tighten it to 162 Nm (119 lb.-ft.).
11. Install the lower arm stops.
See Figure 3.
Note: Align the slot on the lower arm stop with the lug portion on the front side of the lower arm bushing.
12. Install the lower arm with new bolts:
– Lightly tighten the bolts.
– Raise the suspension to load it with the vehicle’s weight before fully tightening the bolts. Do not place the jack against the ball joint on the lower arm.
– Torque the 14 mm bolts to 93 Nm (69 lb.-ft.), and torque the 16 mm bolt to 162 Nm (119 lb.-ft.).
– Install the mounting bolt on the rear side of the stabilizer bar bushing holder, and torque it to 39 Nm (29 lb.-ft.)
 13. Degrease the threaded section and the tapered portion of the ball joint pin, the ball joint connecting hold, and the threaded section and mating surfaces of the castle nut.
Connect the ball joint to the lower arm, being careful not to damage the ball joint boot when connecting the knuckle.
14. Torque the castle nut to the lower torque specification (103-113 Nm [76-83 lb.-ft.]), then tighten it only far enough to align the slot with the ball joint pinhole. Do not align the castle nut by loosening it.
Insert the lock pin.
15. Repeat steps 3 through 14 on the other side of the vehicle.
16. Clean the mating surfaces on the brake discs and the inside of the wheels, then install the front wheels.
17. Check the front wheel alignment, and adjust it, if needed.
Courtesy of ALLDATA.